![]()
An online video course has multiple facets to consider before it’s ready for your audience.
Where do I host the video? Is there a bandwidth limit? How can I restrict the access? How can I take payment?
Solving the above is often done by sticky-taping several online services together. If one plays up, they all play up. Not ideal!
Lucky for us Squarespace, the all-in-one solution for selling anything online, has a reliable Member Areas solution.
You can charge once-off or a recurring subscription, to grant exclusive access to paying members of your community.
In this tutorial I show you exactly how to set up your first course Member Area, add a video collection of premium content, style your course Landing Page and start taking your first payments – all within the same platform!
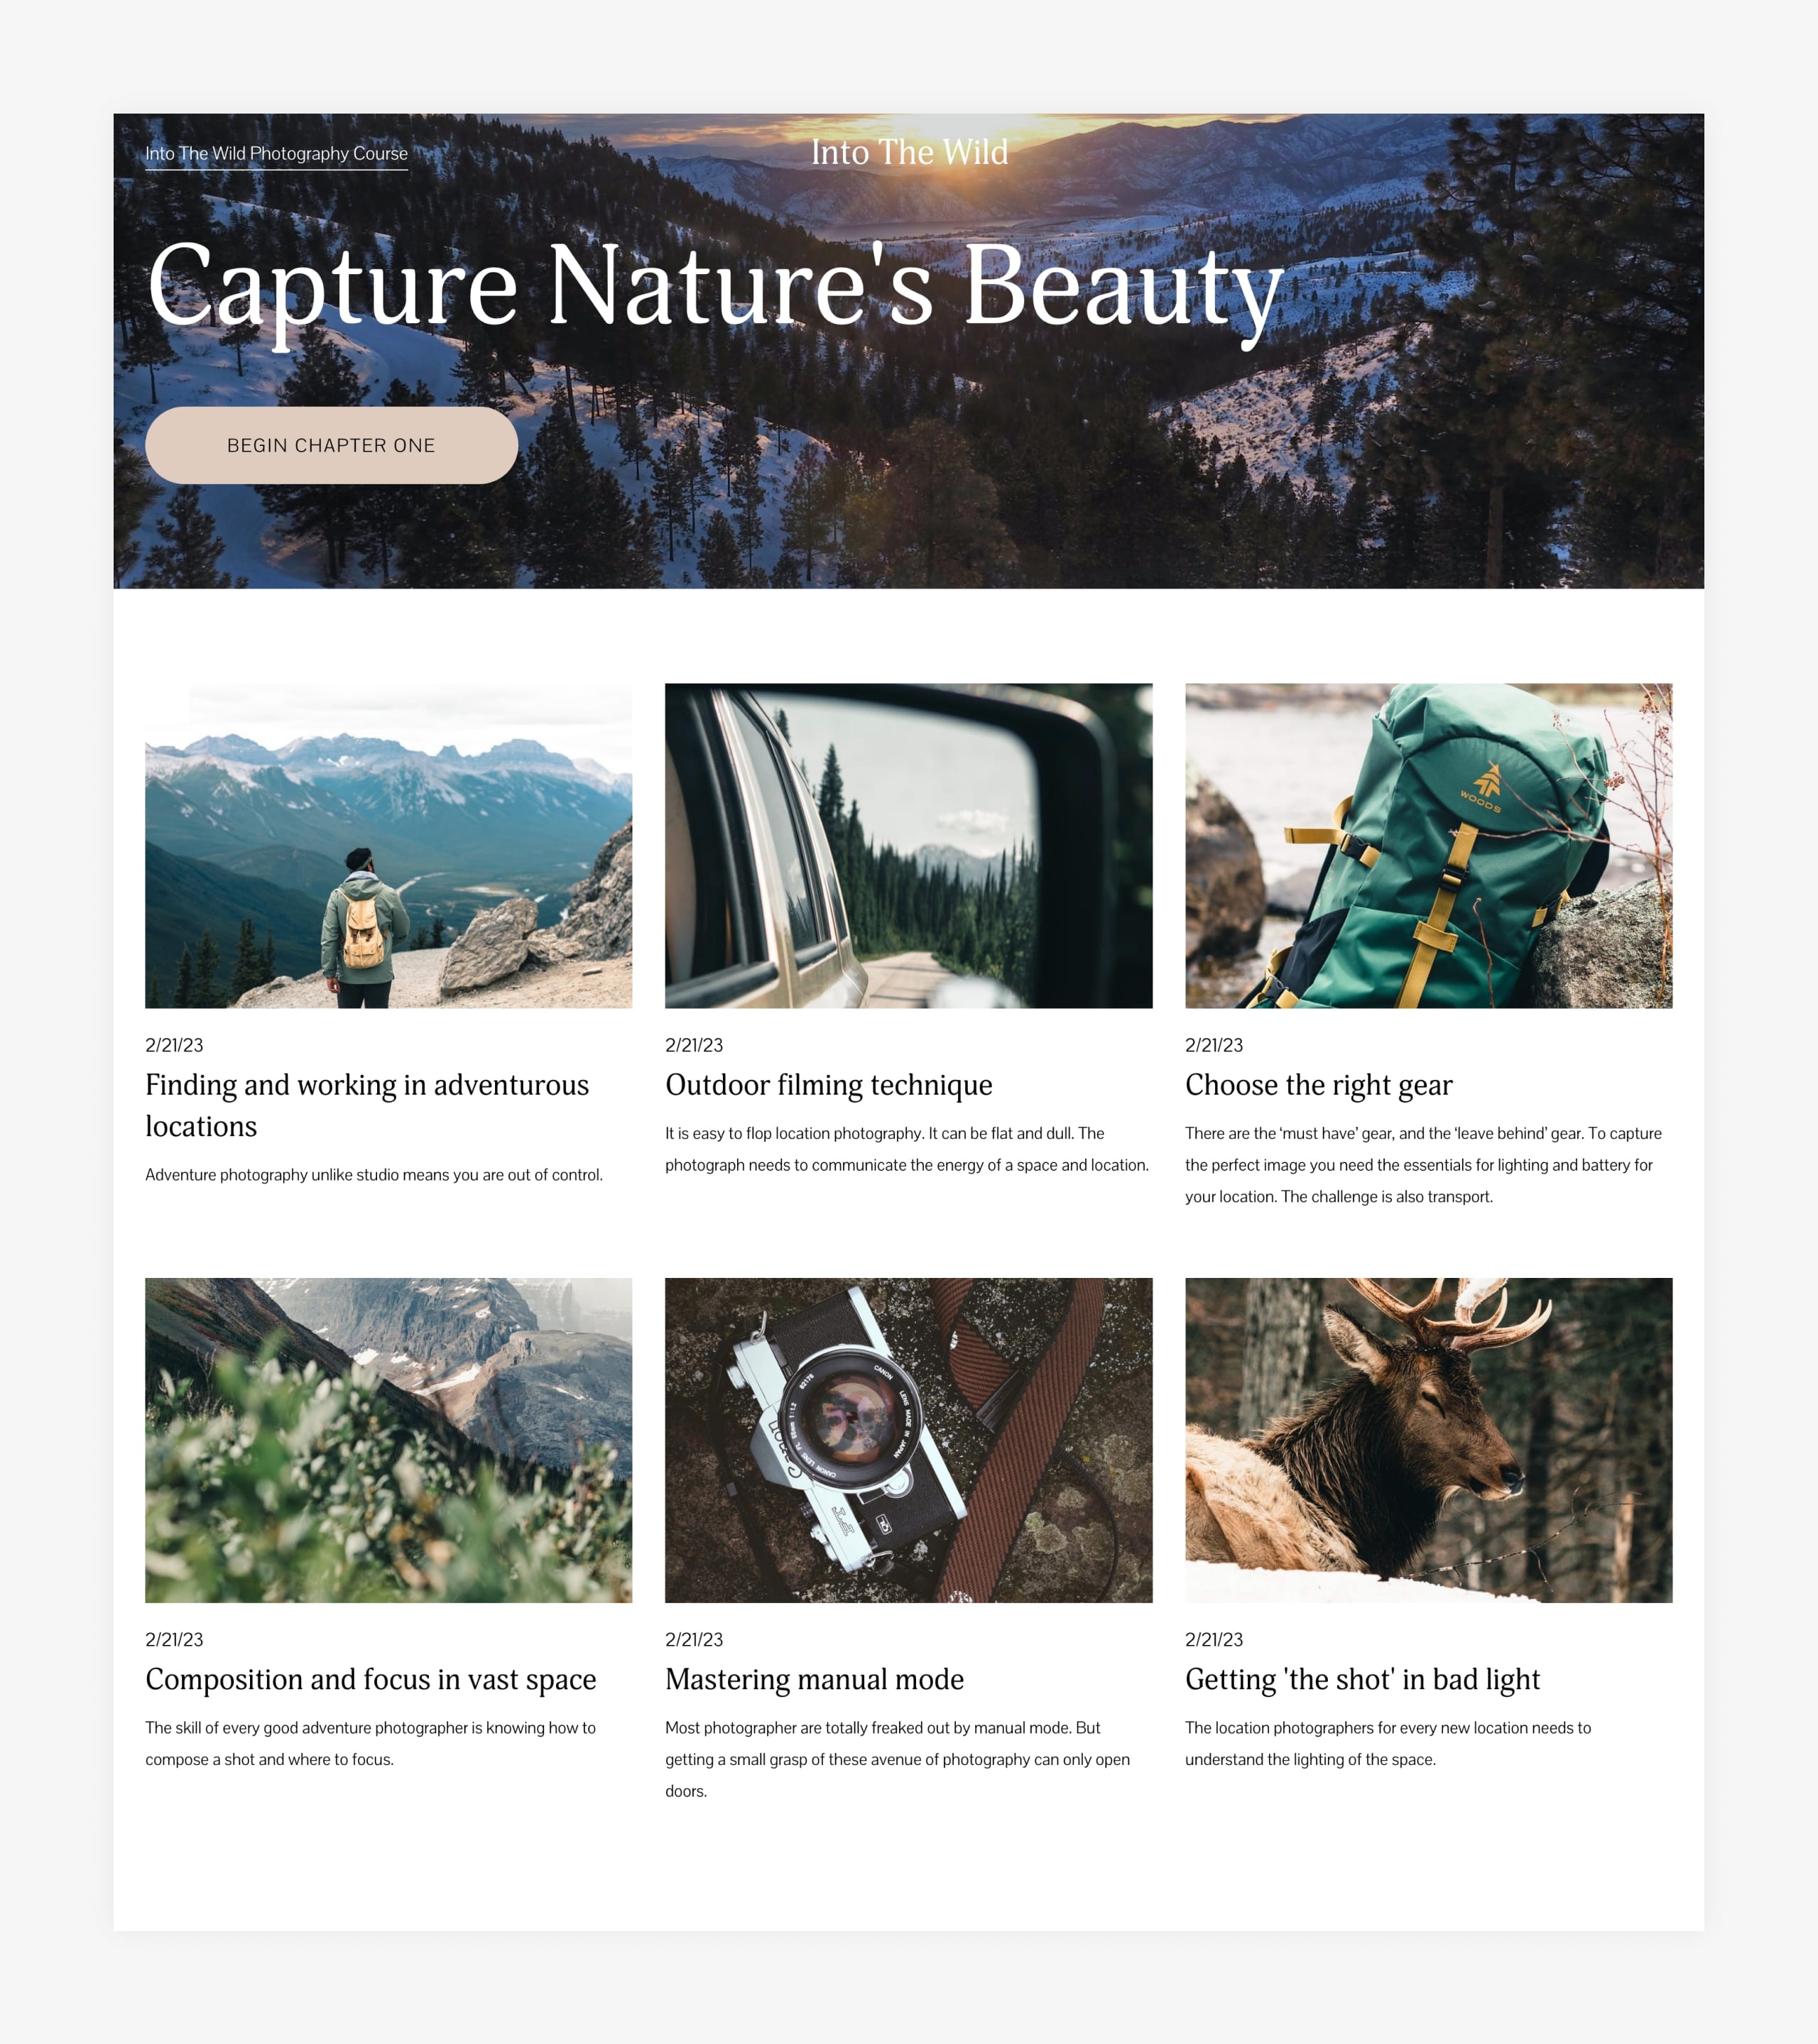
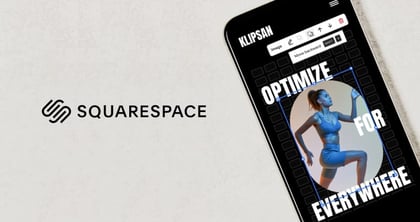
For a better tutorial experience we are going to build a landing page and Member Area for a beginners photography course called Into the Wild. Let’s take a sneaky peak at our final course landing page, just so you know what you’re in for ;)
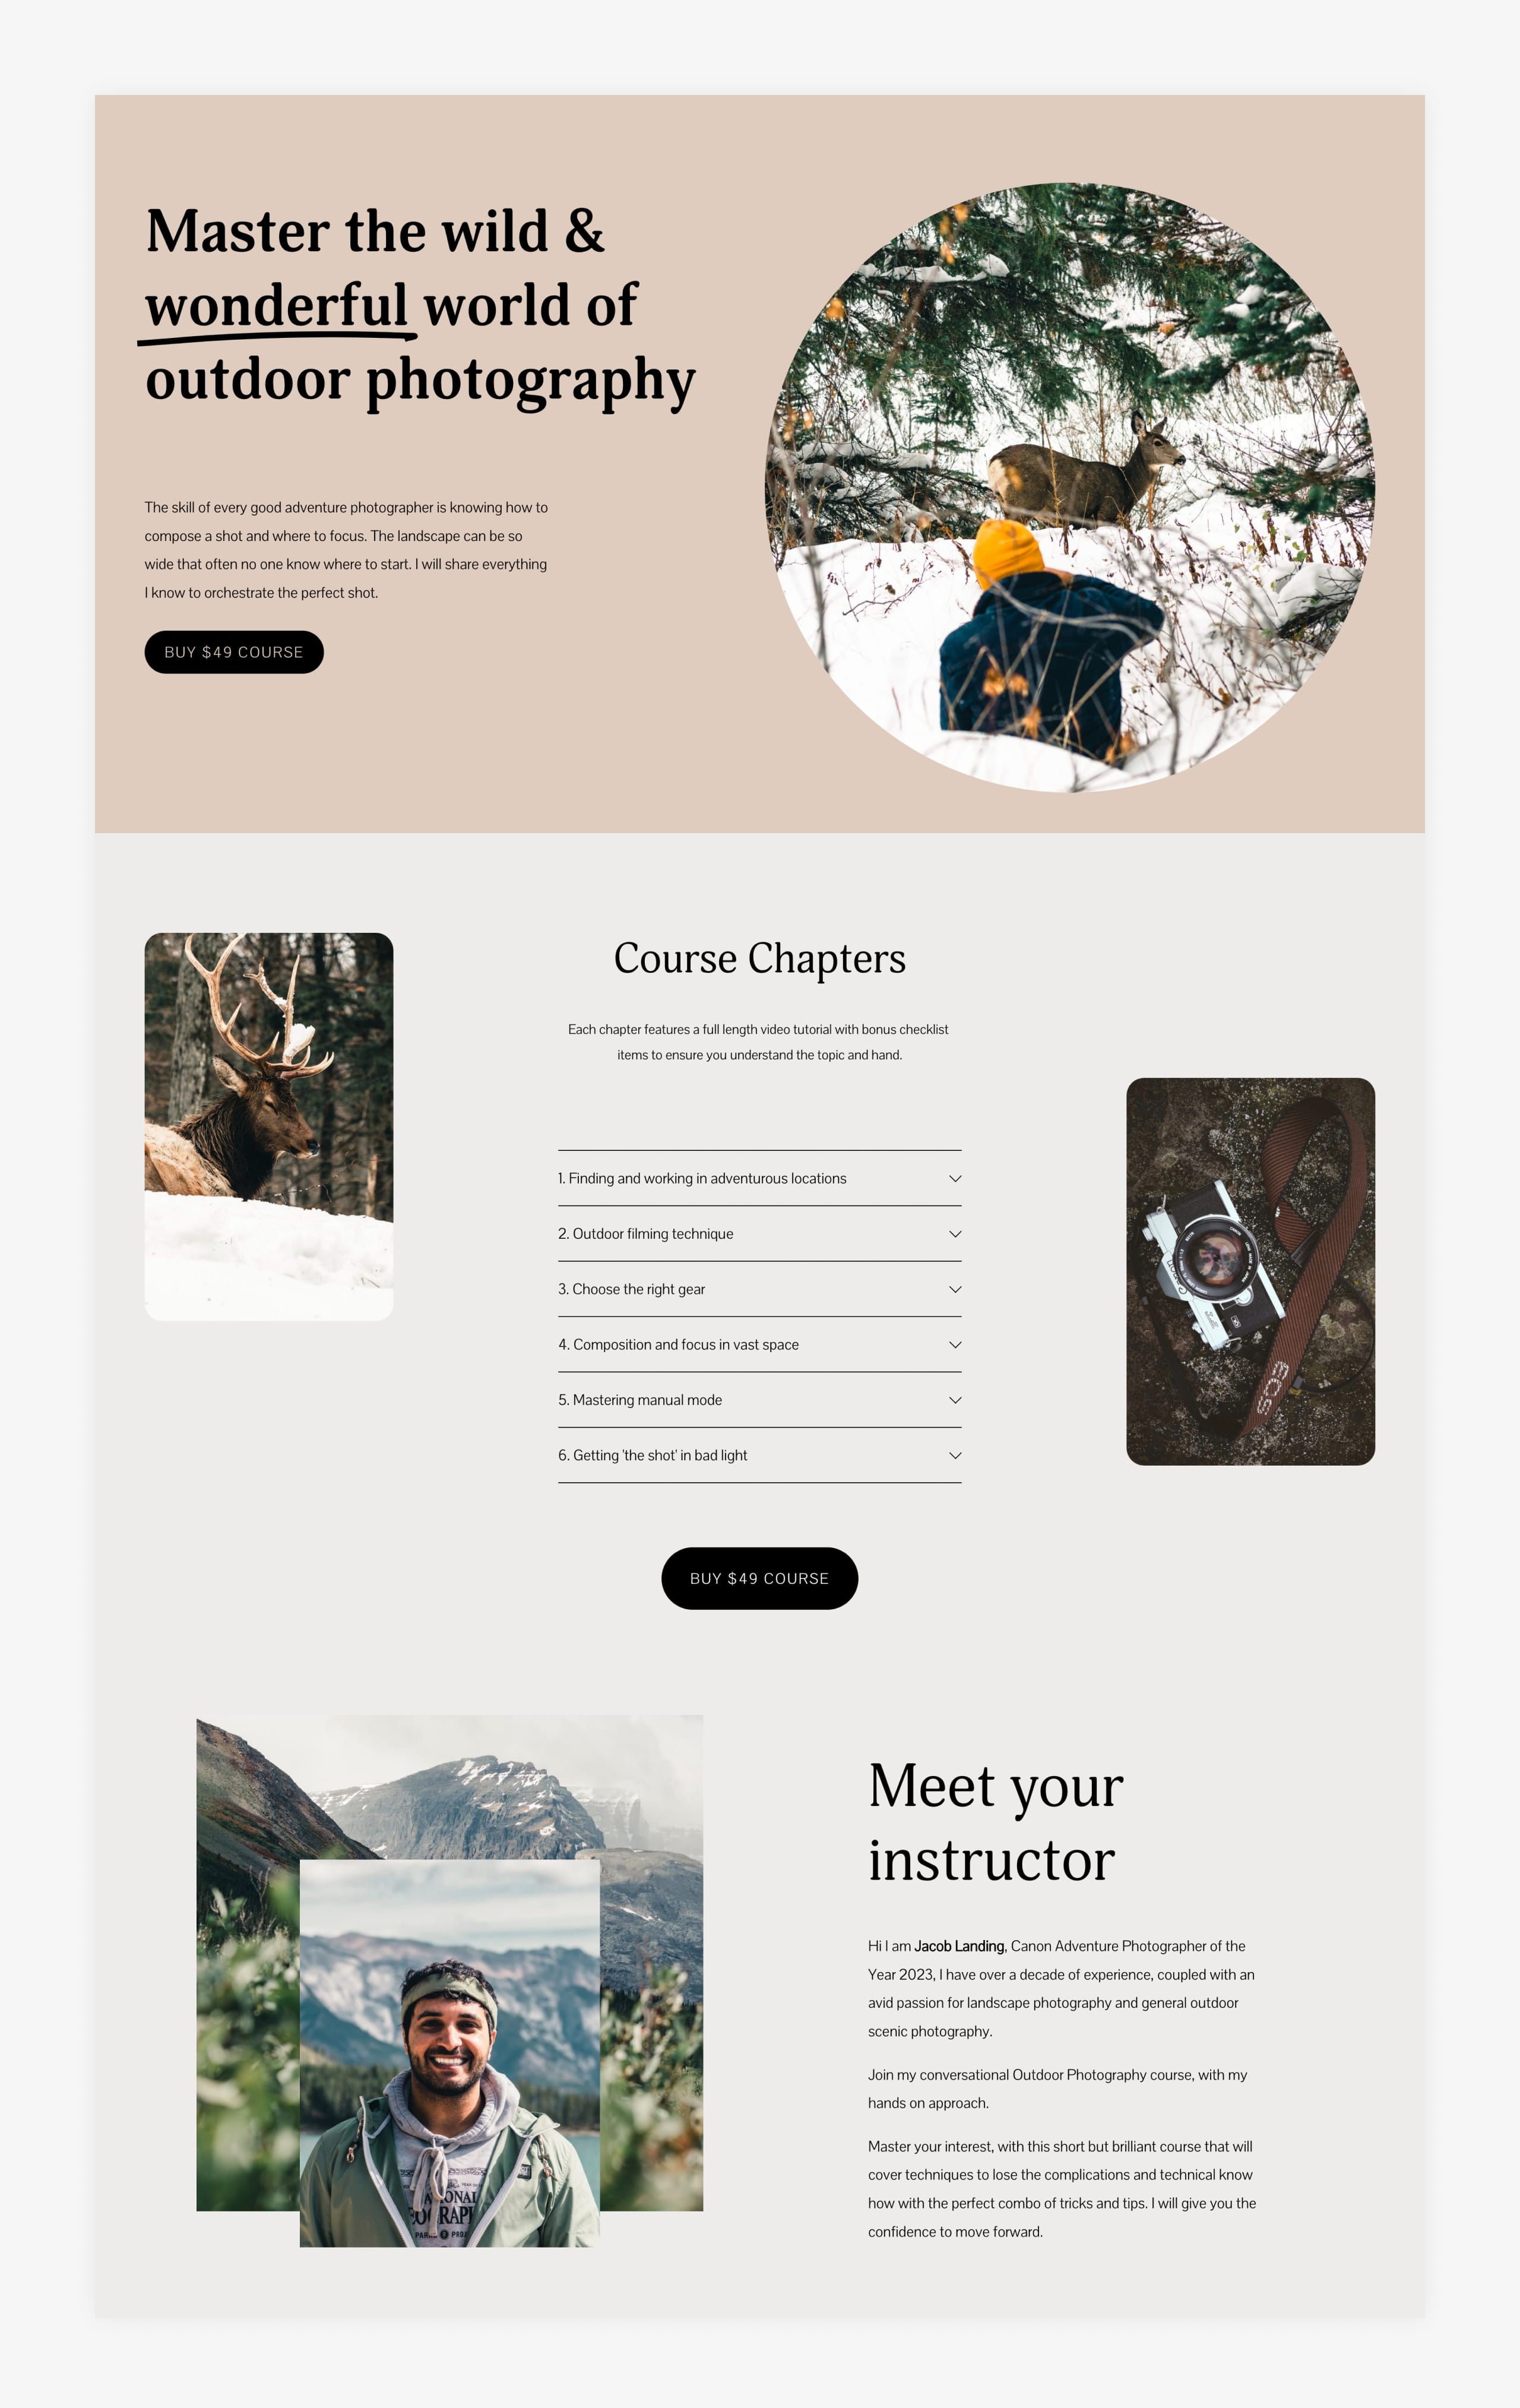
Neat right! And there is a full premium video course behind that payment button. Ok, let’s climb in.
One Page Love Exclusive Coupon
Yay! Squarespace has been kind enough to give One Page Love readers the exclusive coupon OPL10 for 10% Off* your first website or domain purchase. (There is a free 14-day trial with no credit card needed, so you can try risk-free.)
Tutorial Overview:
- Sign up at Squarespace
- Construct a basic course landing page
- Set up your course Member Area
- Add course content and upload videos
- Refine course landing page
- Connect your course domain name
- Announce your online course!
Before we get going let’s answer the burning question:
FAQ: How much does it cost to use Squarespace Member Areas for an online course?
Squarespace Member Areas are available in-addition to a Squarespace website. But don’t worry I’m going to break down exactly how much it costs using different online course scenarios.
It’s also worth noting, you are only charged for Member Areas once you start inviting your audience to access your course. It’s free to set up and tweak the course design and structure as long as you need :)
Pricing starts at only $9/month for Squarespace Member Areas, so including a standard Squarespace website ($16/month), the total cost would be $25 per month, if paying annually (or $33/month if paying monthly). Also remember your $16/month website includes unlimited visits, and unlimited pages/blogs for content marketing.
Member Areas pricing overview:
There are 3 Member Areas pricing tiers:
| Member Areas package: | Starter | Core | Pro |
|---|---|---|---|
| Number of member areas | 1 | 3 | 10 |
| Video storage | 5hrs | 20hrs | 50hrs |
| Transaction fee | 7% | 4% | 1% |
| Unlimited members | ✓ | ✓ | ✓ |
| Member Areas costPer month, if paid annually | $9 | $18 | $35 |
| Squarespace website costPer month, if paid annually | $16 | $16 | $16 |
| Total cost per month Member Areas + website, if paid annually | $25 | $34 | $51 |
So which tier do you choose for an online course?
For an online course you would only need a single Member Area but as you start growing, you start saving more money by opting into higher tiers with lower transaction fees.
Here is the same “Ten $49 course sales in a month” use-case broken down across the 3 tiers:
- $9 Starter Tier: If you sold 10 x $49 courses per month the charges would be $9 tier + $34.30 fees (7% of $49 = $3.43 per sale x 10 sales = $34.30) =
$43.30. - $18 Core Tier: If you sold 10 x $49 courses per month the charges would be $18 tier + $19.60 fees (7% of $49 = $1.96 per sale x 10 sales = $19.60) =
$37.60. - $35 Pro Tier: If you sold 10 x $49 courses per month the charges would be $35 tier + $4.90 fees (1% of $49 = $0.49 per sale x 10 sales = $4.90) =
$39.90.
Analysis: Core tier is the best saving ($37.60) however don’t forget the Pro tier, at only a tiny bit more ($39.90), offers 10 different Member Areas and 50hrs of video storage.
Ok, now that you know the exact costs, let’s dive into the tutorial!
1. Sign up at Squarespace
Sign up at Squarespace (using the coupon OPL10 for 10% off) with any plan starting at only $16/month, if paid annually. Squarespace will handle several areas of your marketing website from uptime, security, and unlimited blogging for content marketing.
2. Construct a basic course Landing Page
There are two options at this point:
- Browse the collection of pre-designed website templates and choose a good starting point for your course landing page.
- Compile your own course landing page by choosing the page sections you want.
Squarespace has recently rolled out a brilliant new page builder, where you can stack all the sections you’ll need in a long-scrolling landing page. I always want more control on my page designs, so I chose this option.
Remember this step is to simply compile our course landing page, we’ll refine the content later on.
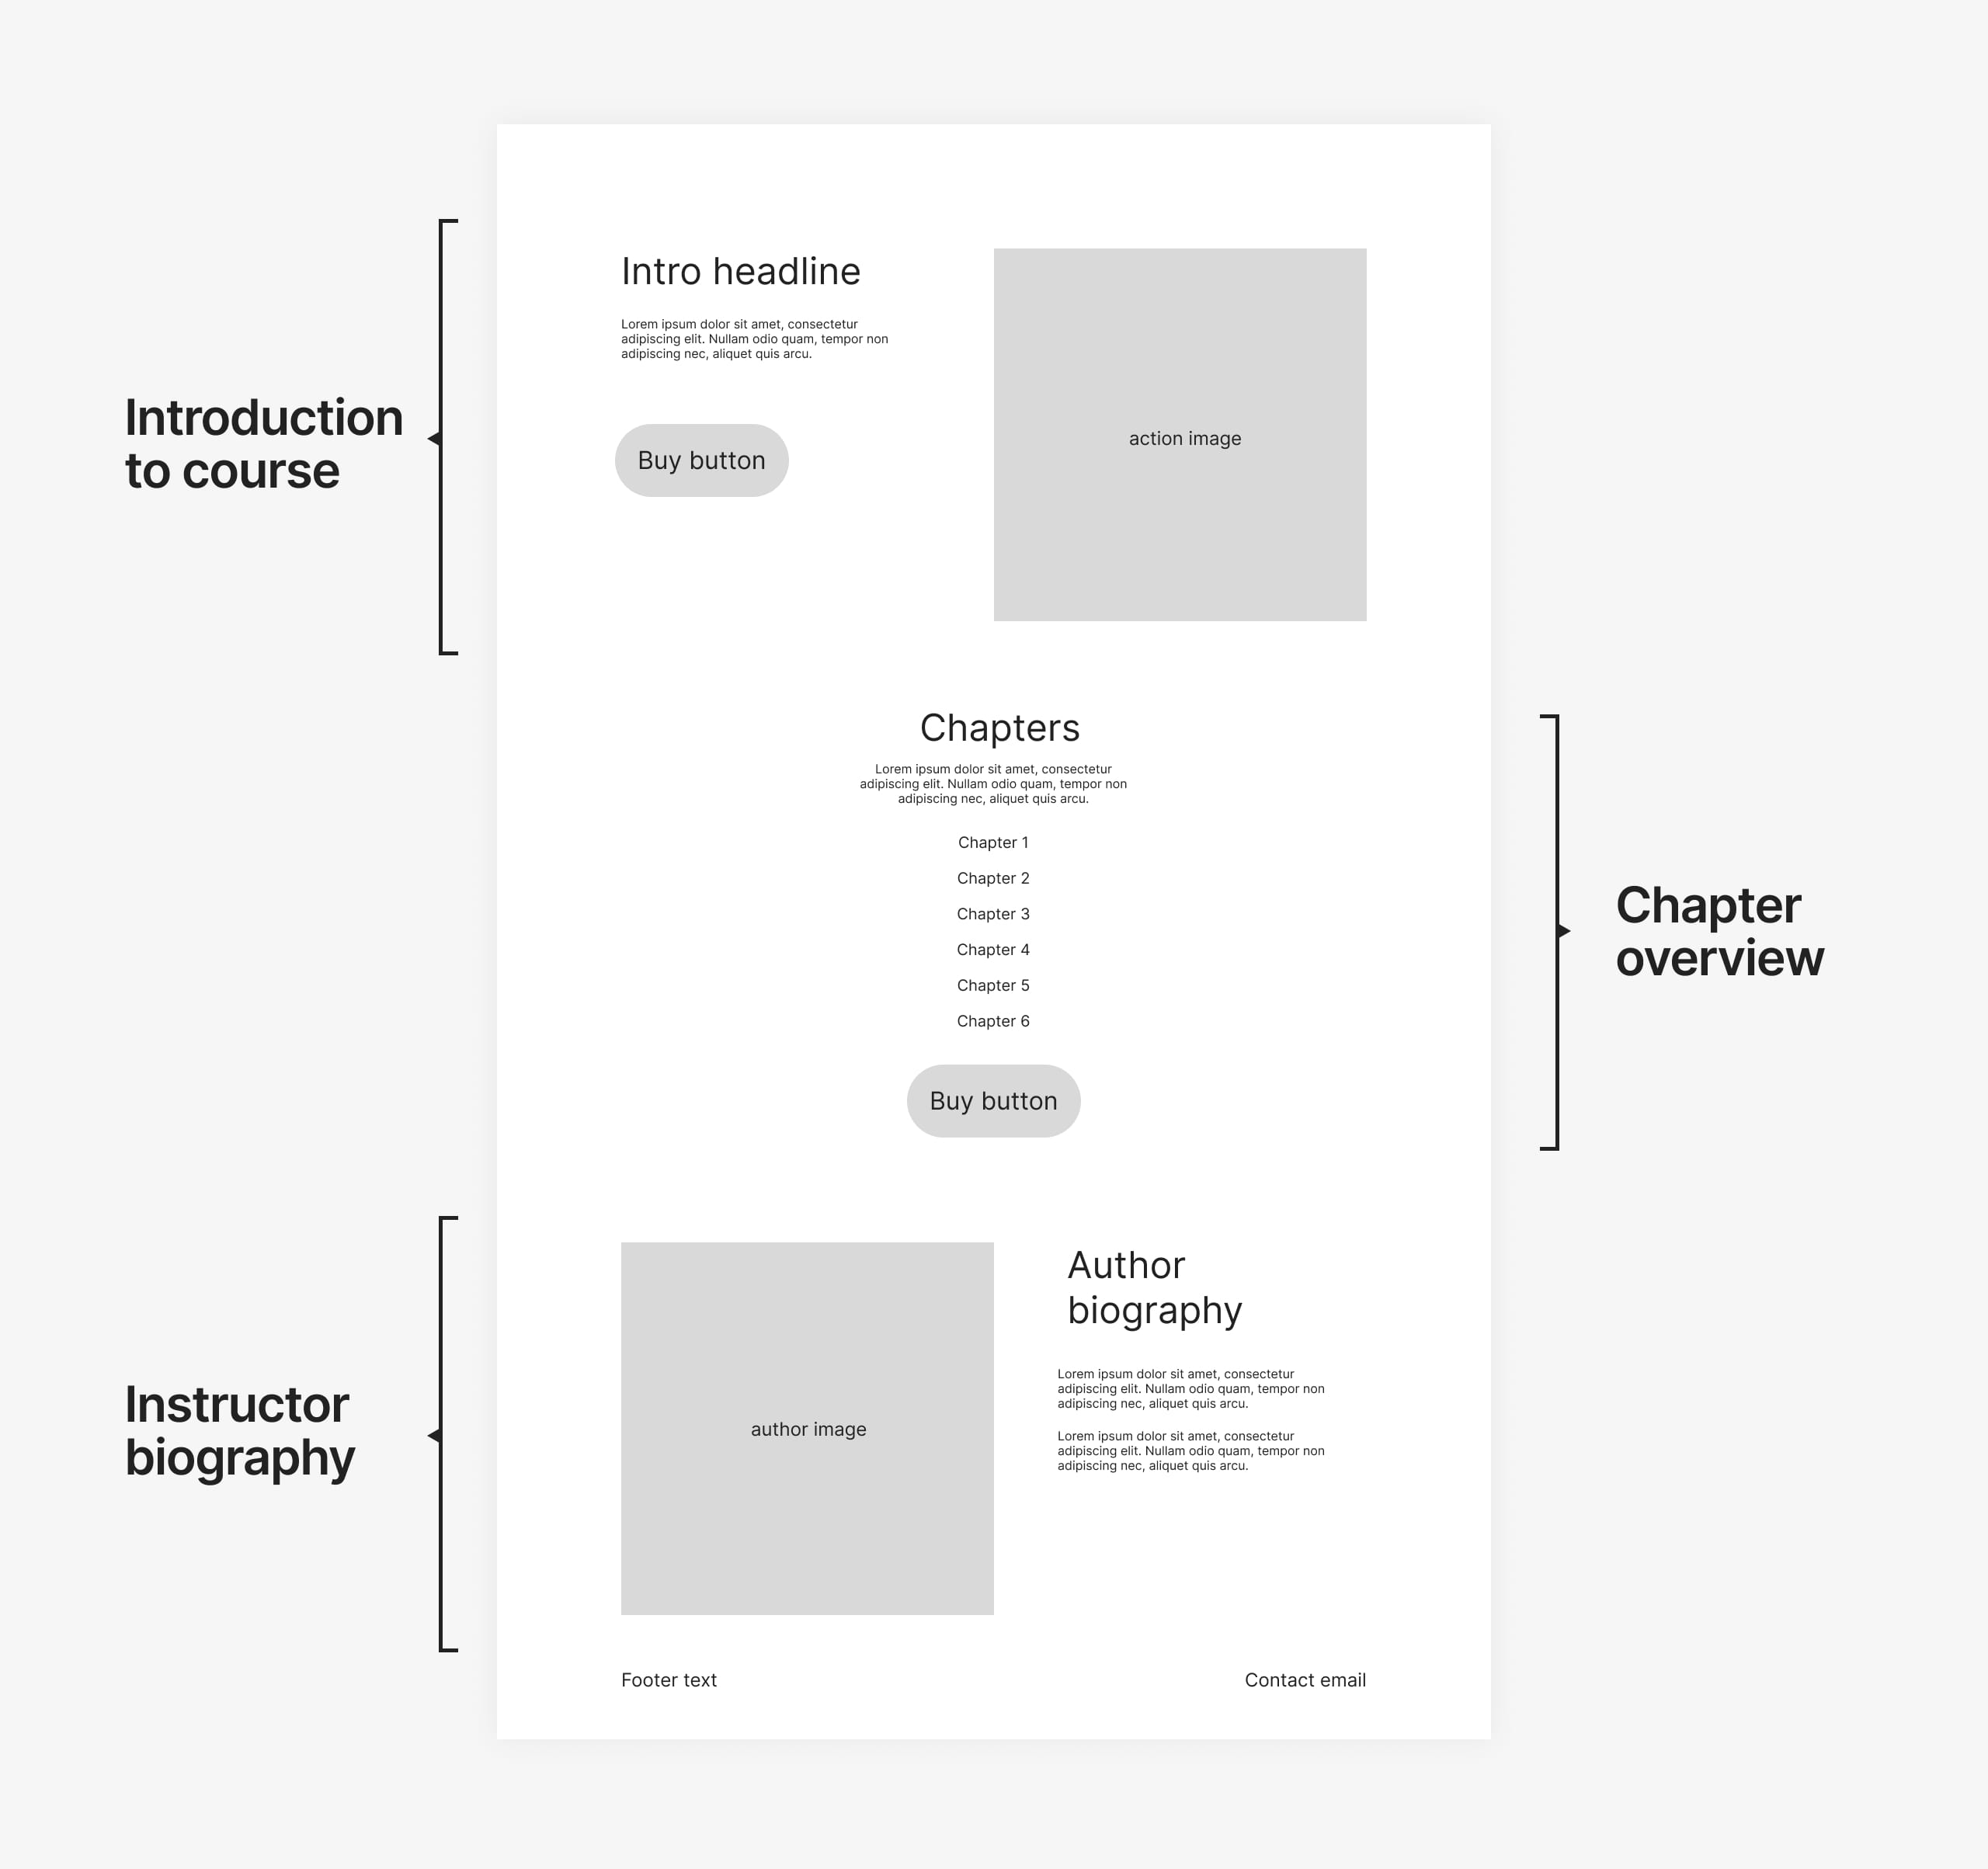
💡 A smart approach to building your own page is to first sketch out the ideal layout you want for your course. Here is a quick sketch I put together where I want a course introduction, chapter overview and instructor biography at the bottom:
Now that we have an idea of what we want, head on over to the templates section of Squarespace and find this block to begin:

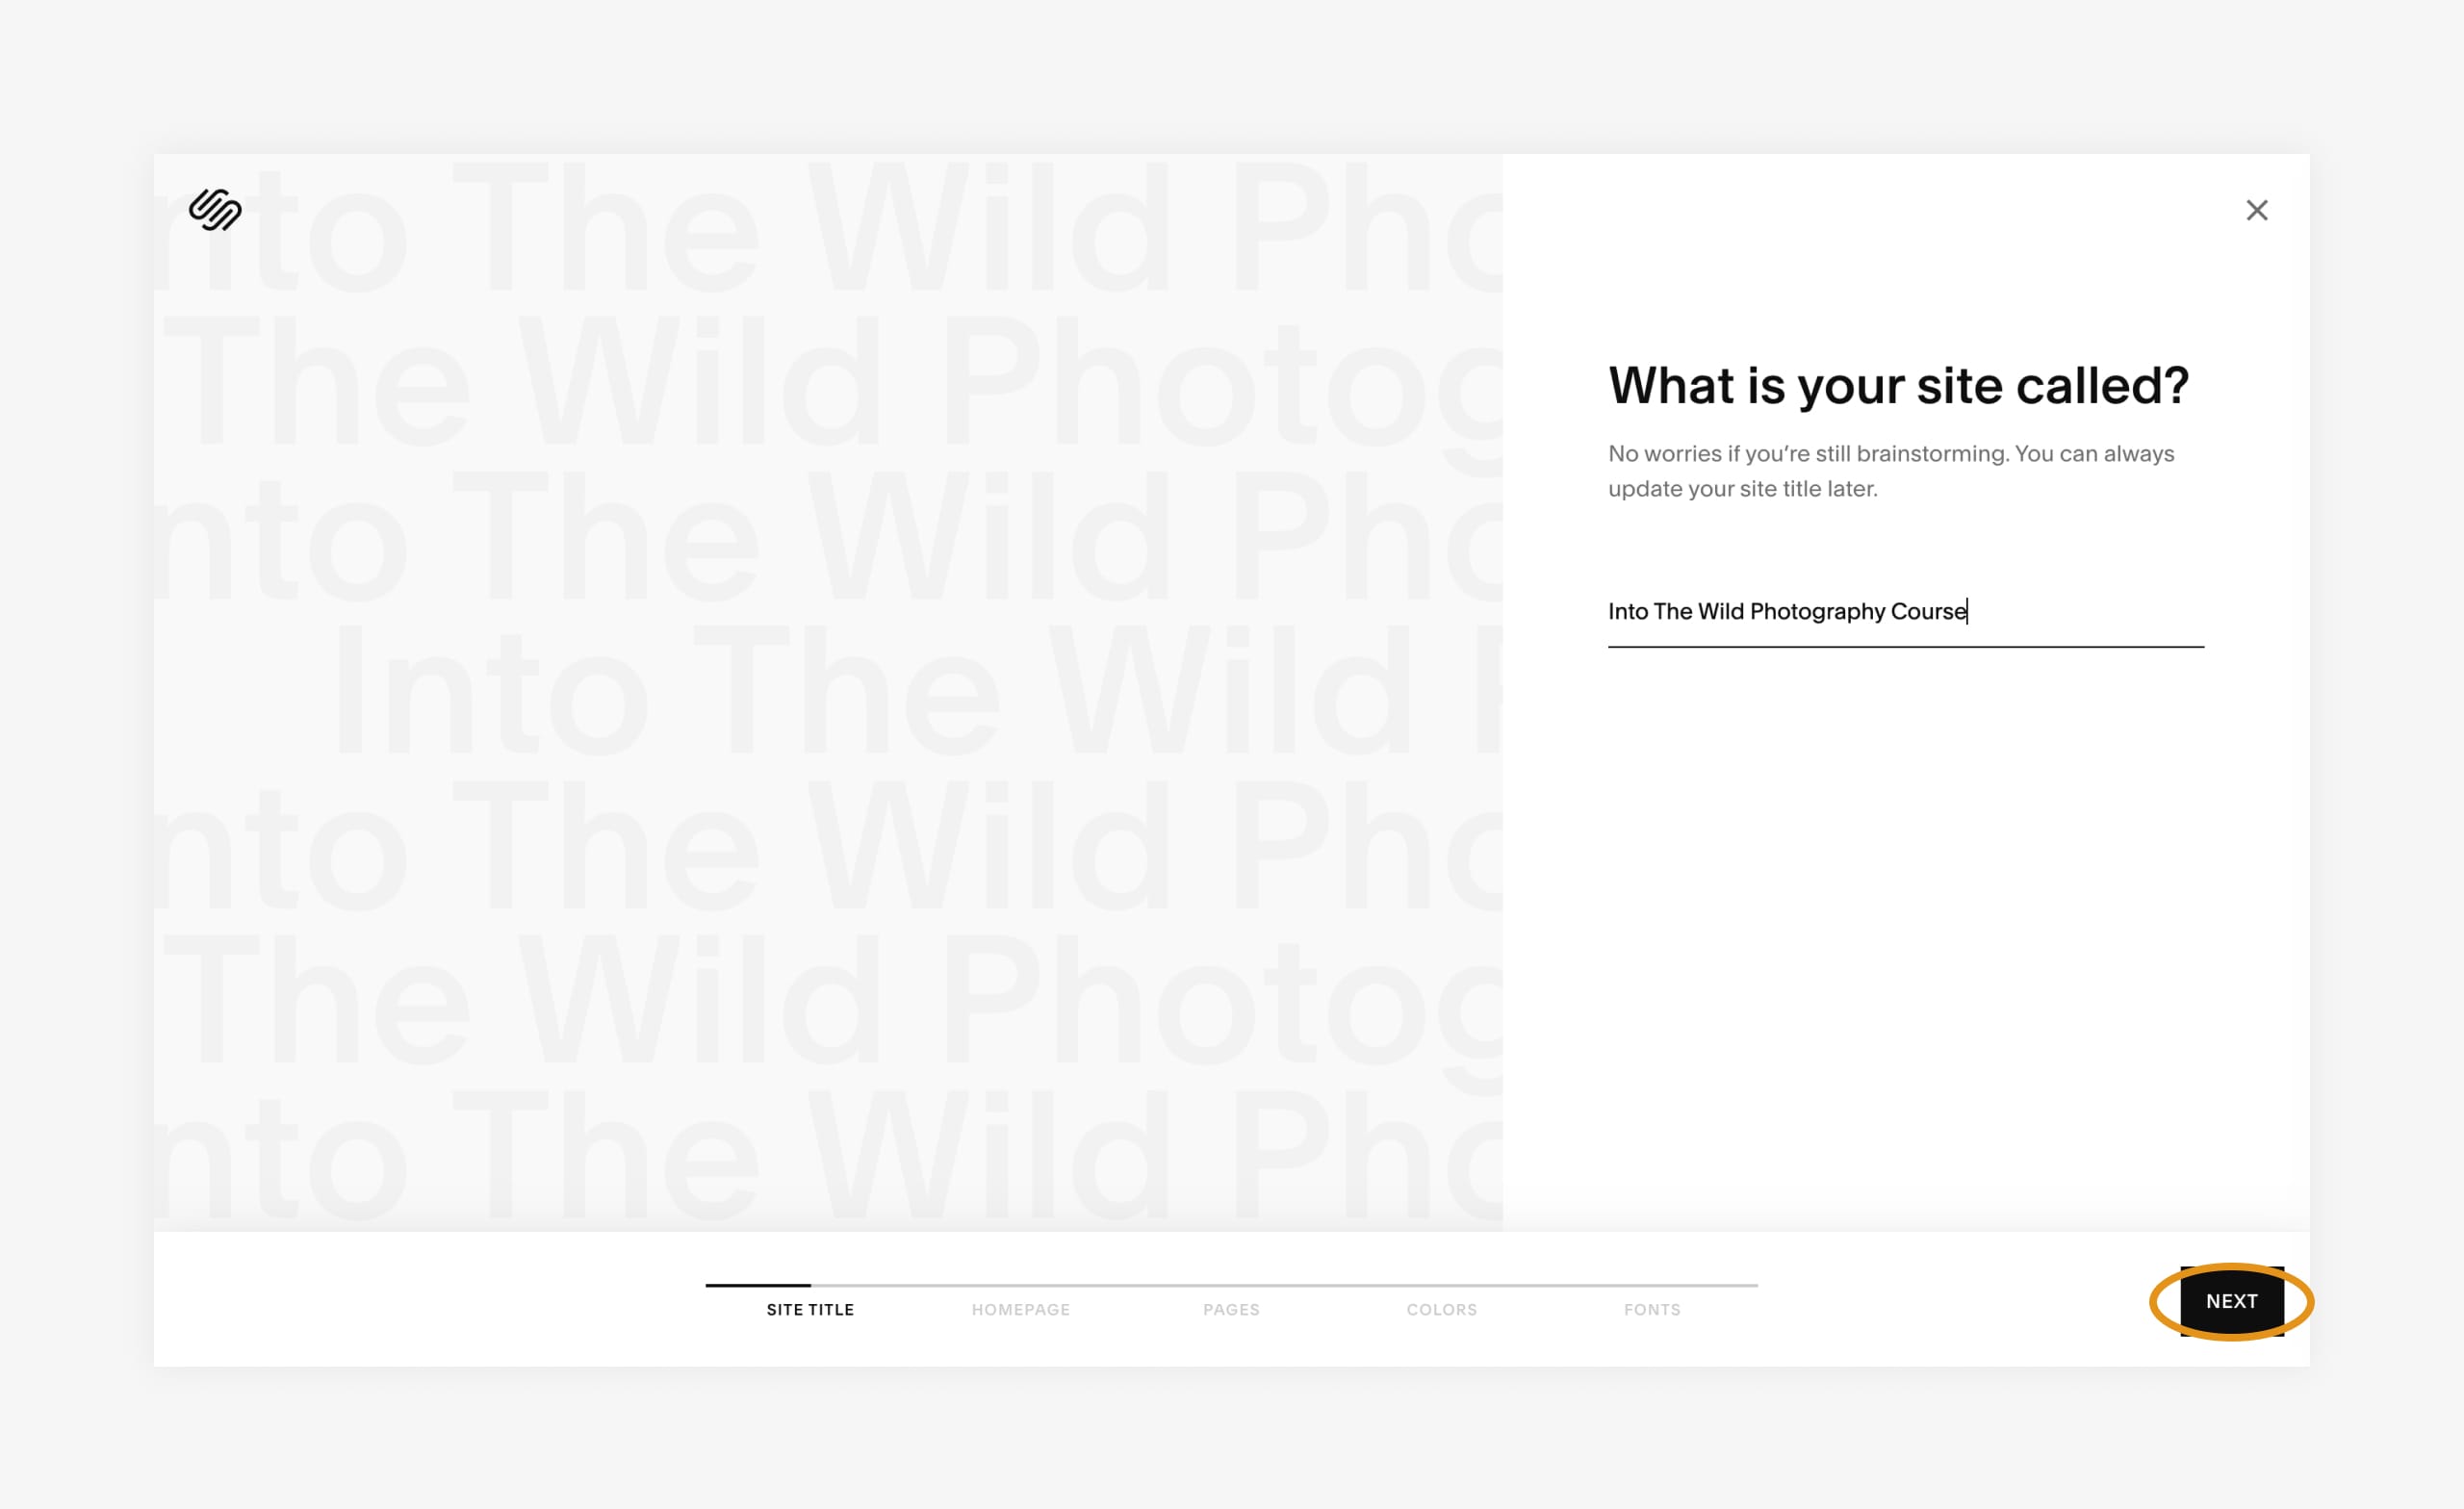
Start by entering in your course name, then clicking Next to begin the building experience:
Next open up the page section options and try to pair the section designs with your needs. Remember you can always add more later on.
Note how I didn’t add Social and Forms sections as I didn’t need them. Progressing along, I skip the Pages section (as we only need a single landing page) and tweak the color scheme slightly (to Neutral colors) and choose a font family (Adonis) I liked. Again, this can all be changed at the end.
Let’s step back a bit and compare our original sketch to the newly built page:
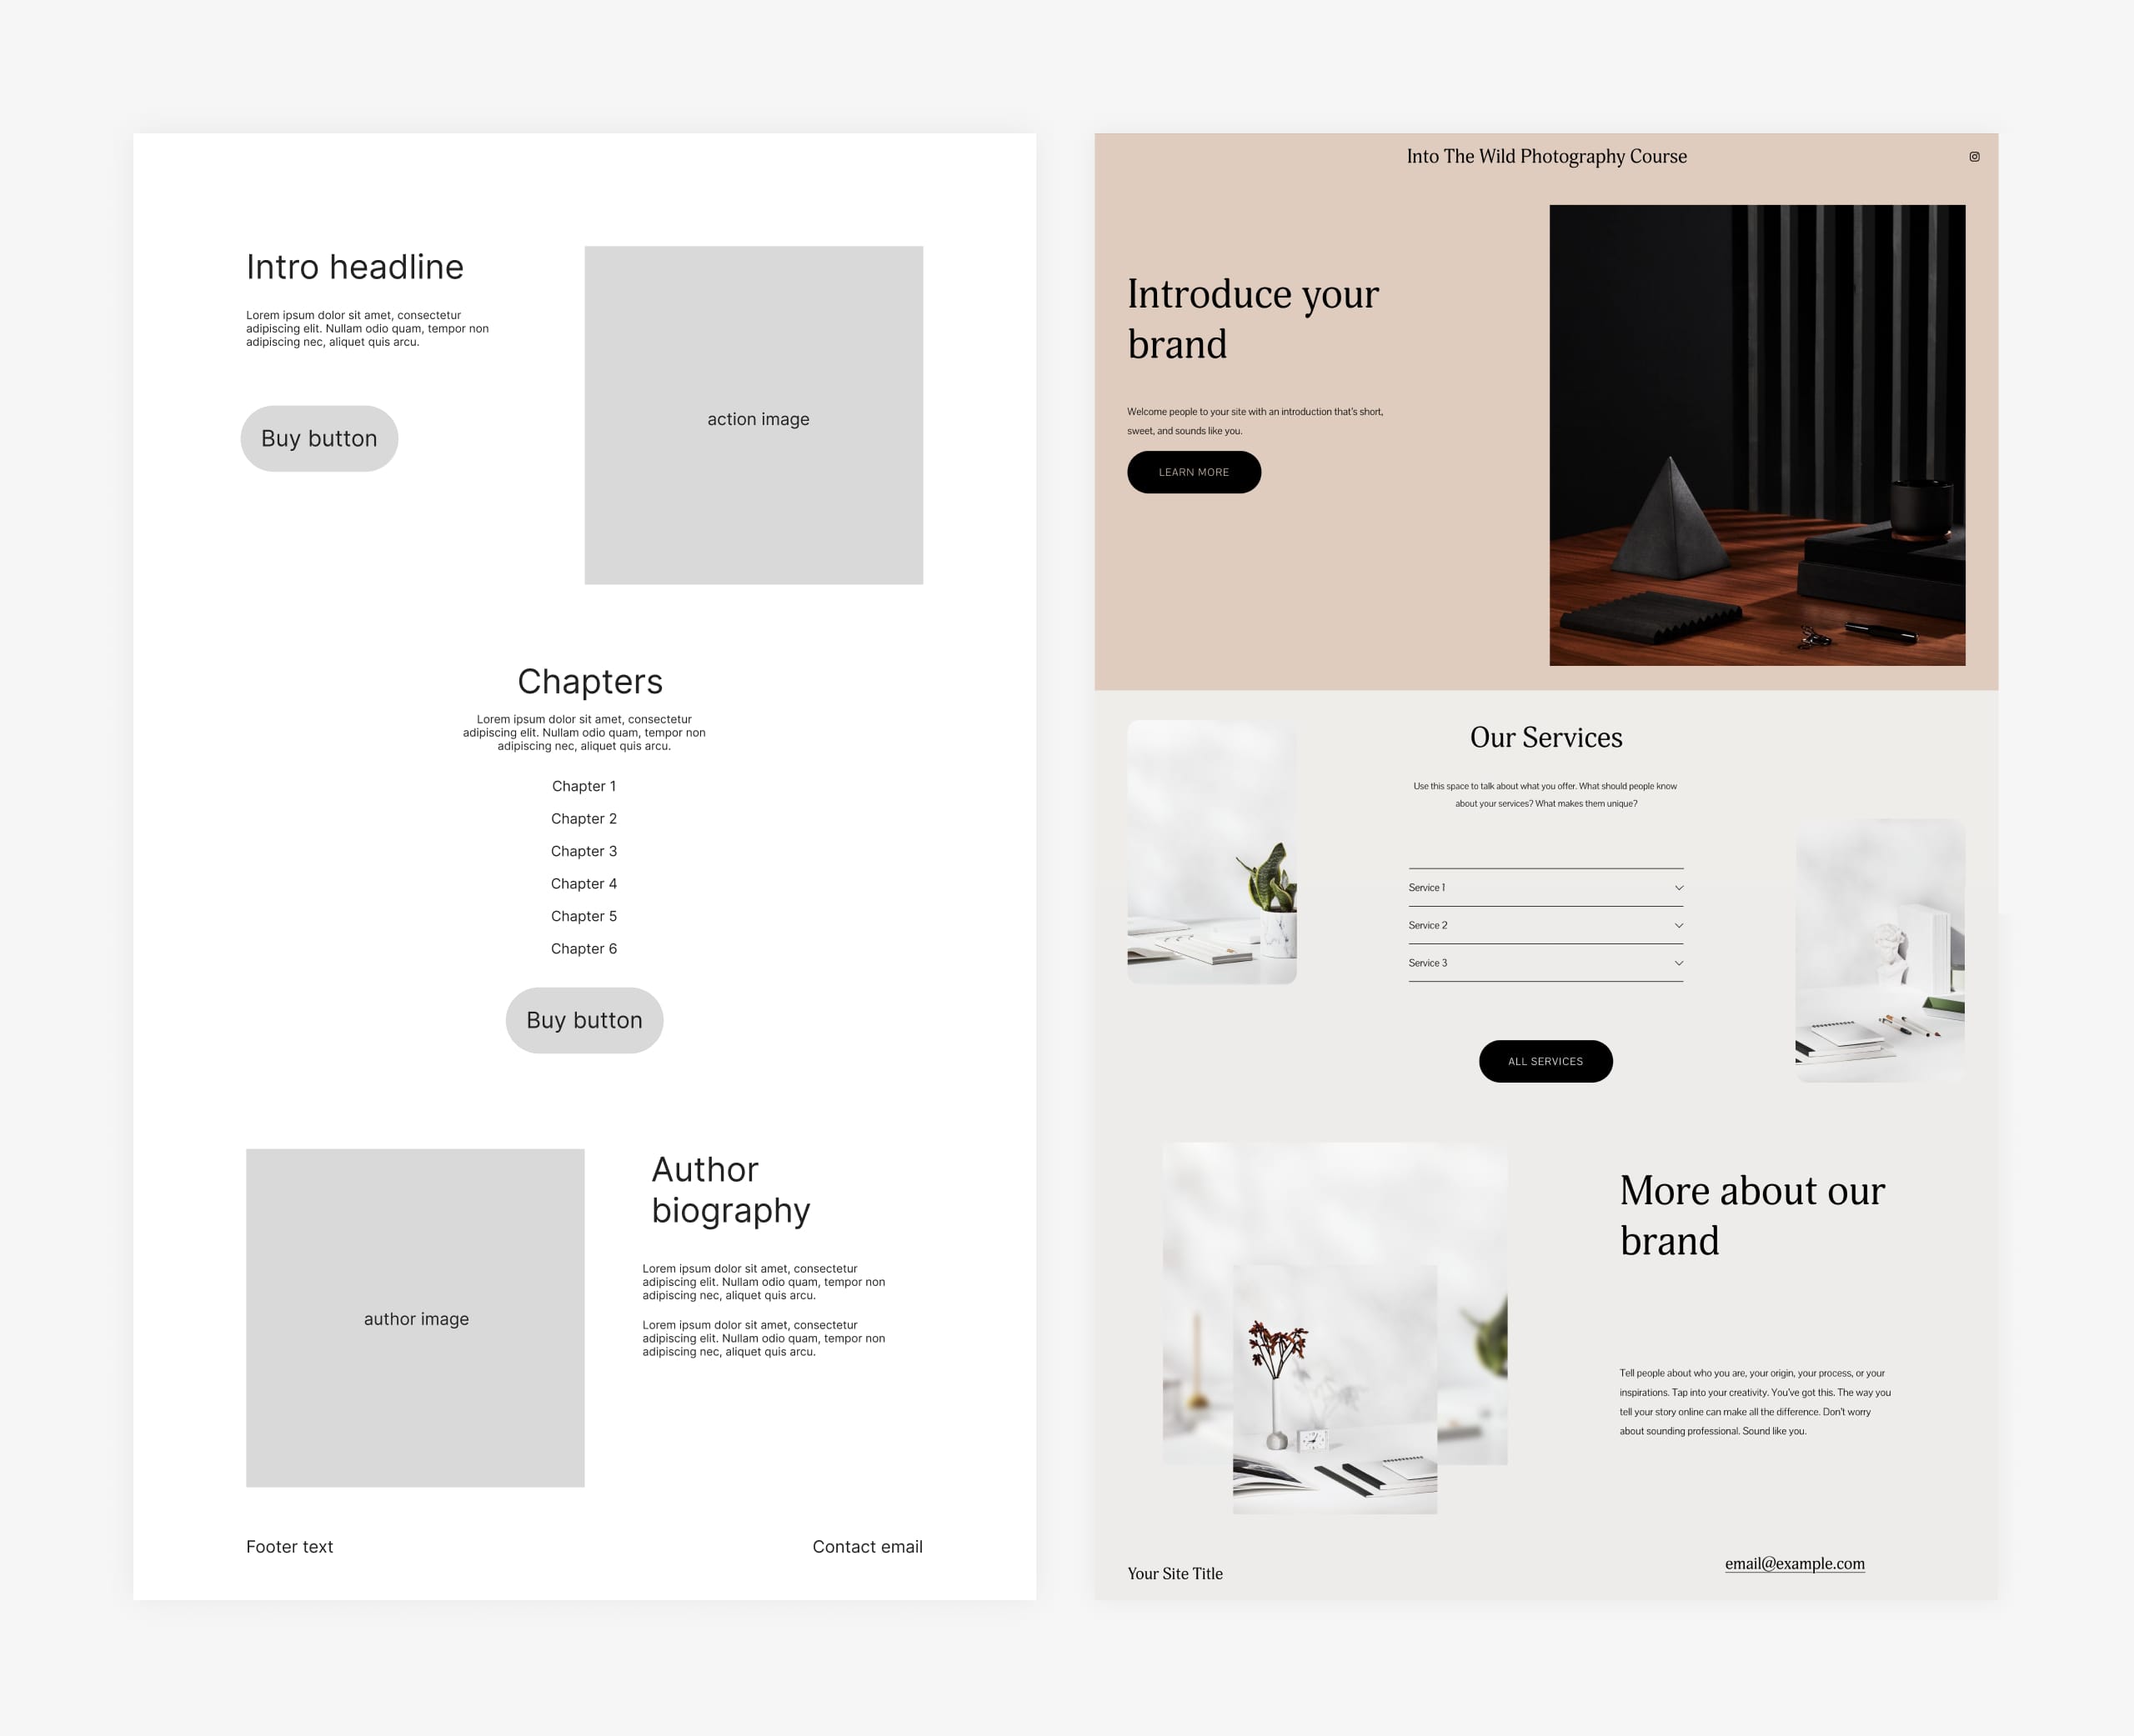
Wow, pretty close, exciting!
3. Set up your course Member Area
In your Squarespace dashboard, head to Settings > Member Areas > Get Started to activate the add-on:
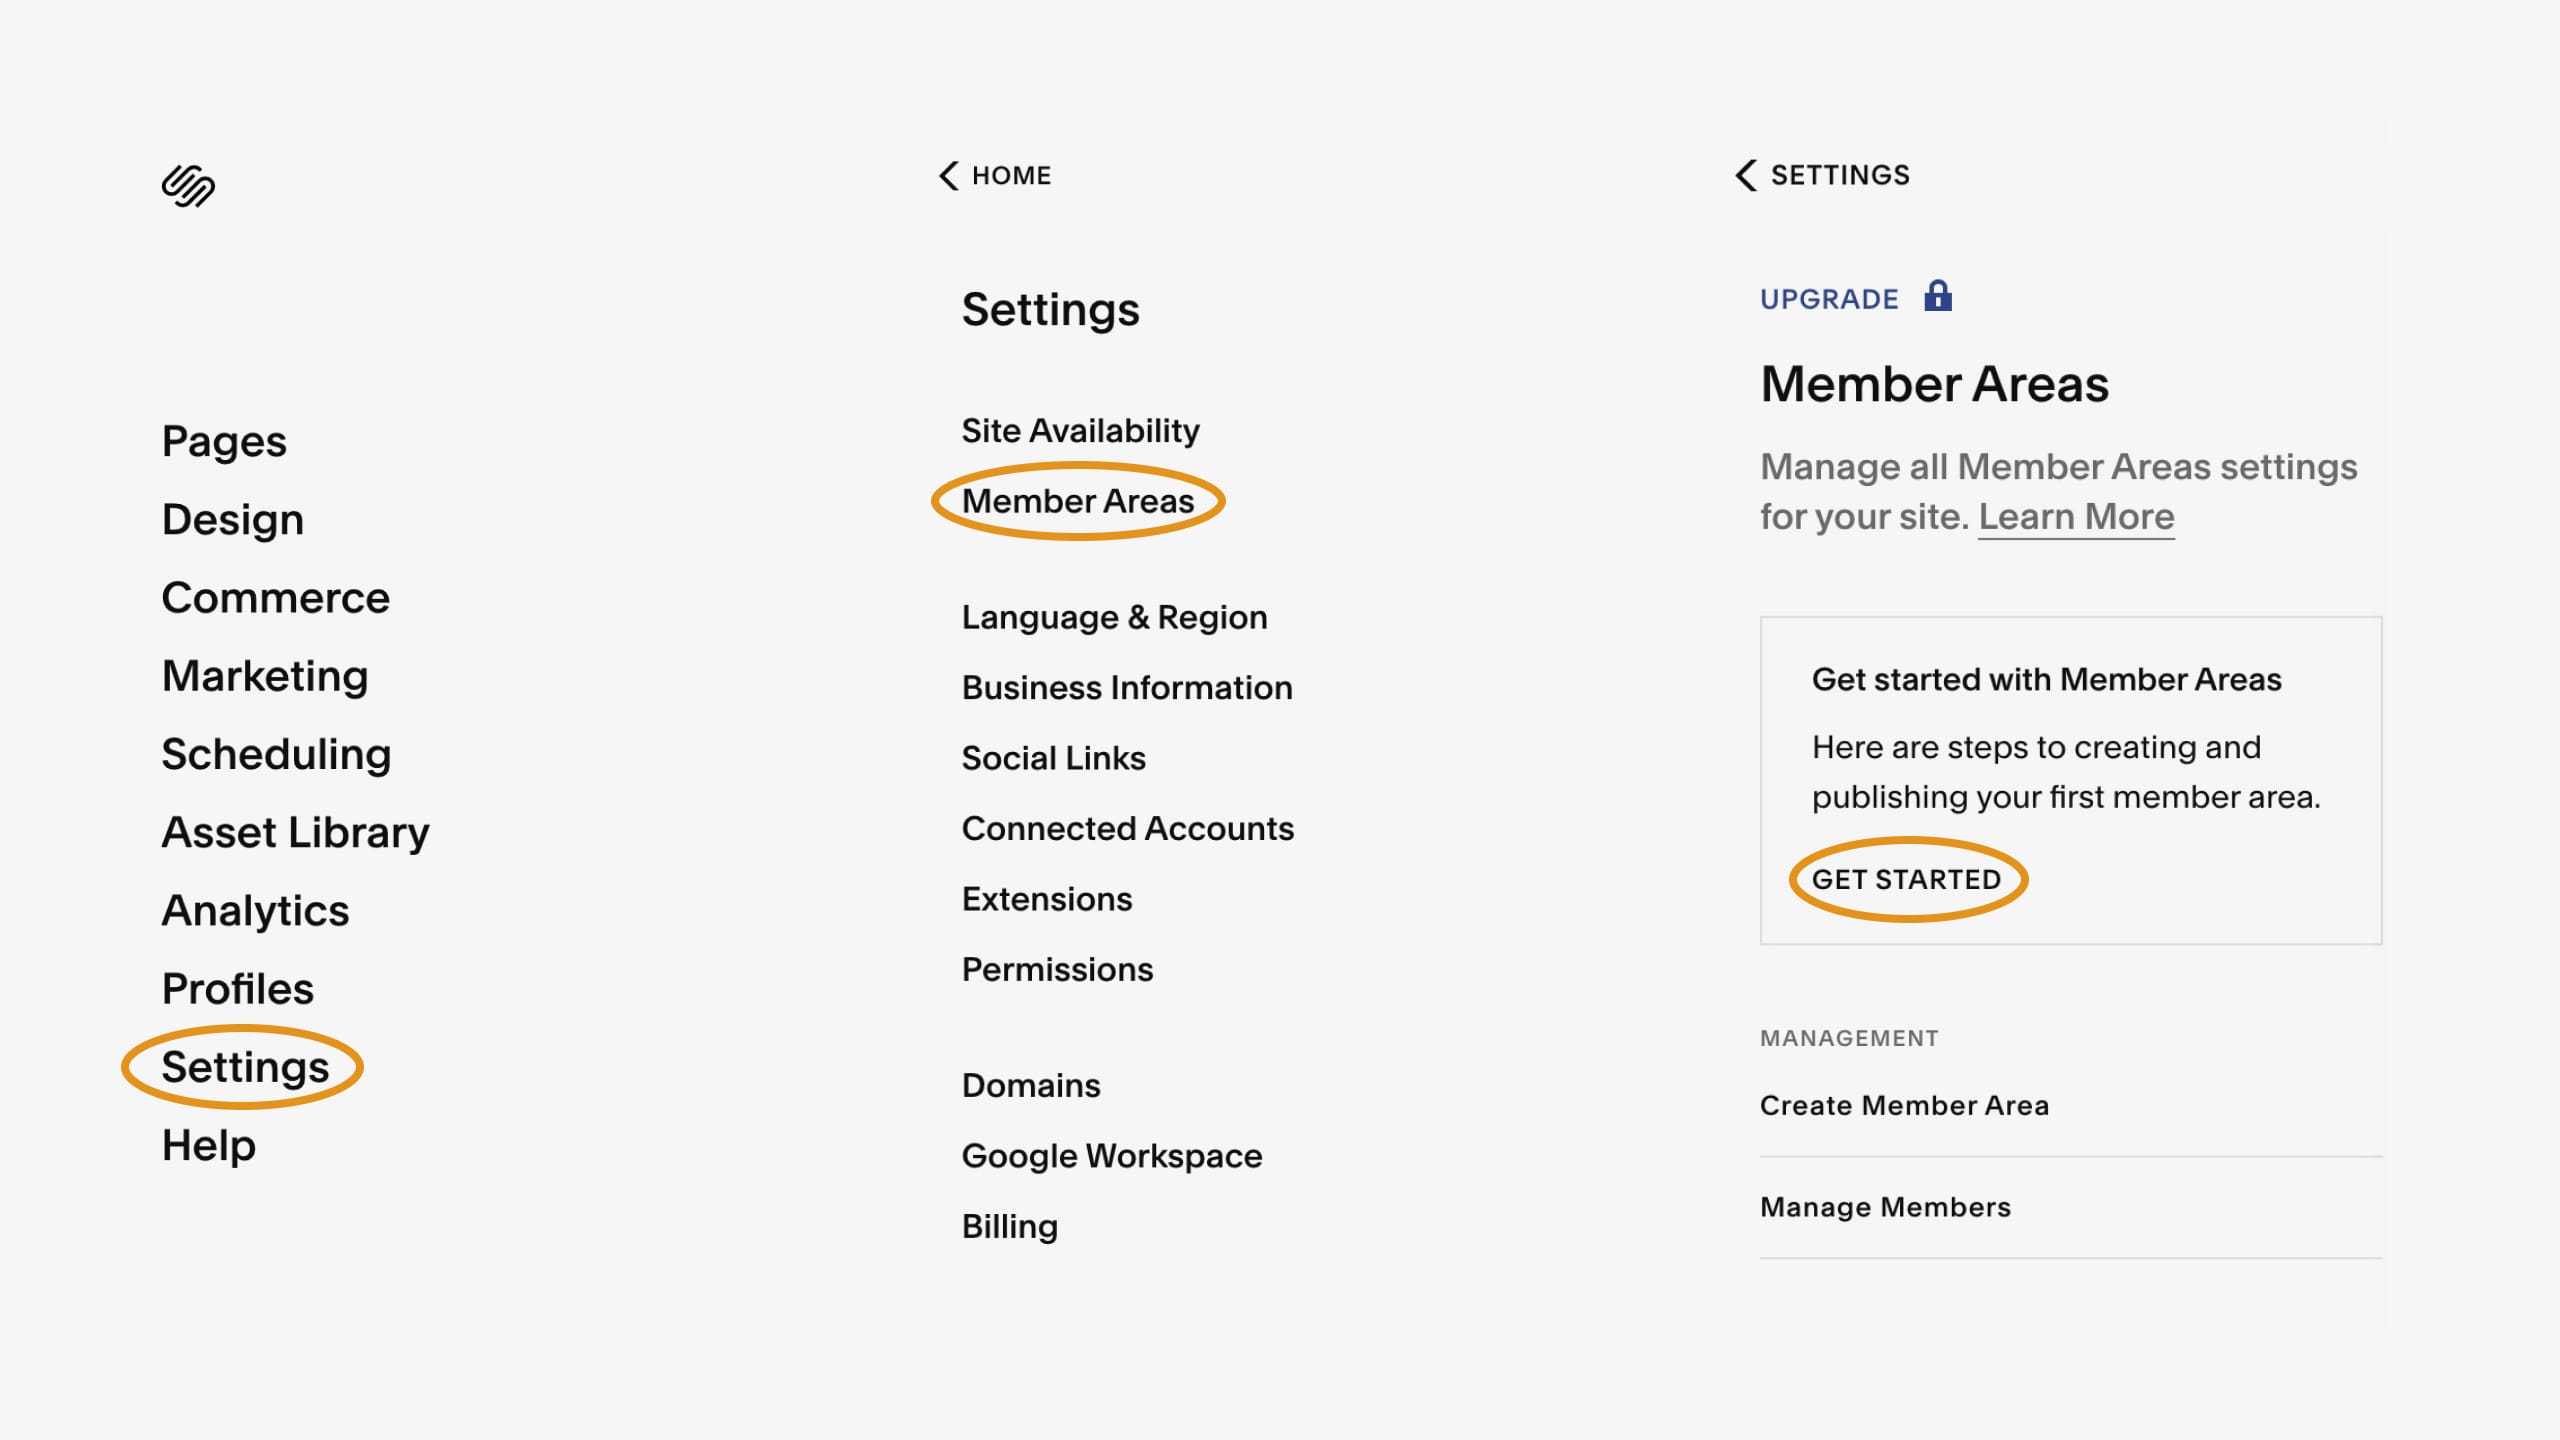
At this point, it’s worth pointing out are 3 membership types you can set up for your community to access your online course:
- Fixed Amount – One-time payment for lifetime course access.
- Subscription – Recurring payments, where course access is revoked if payment stops.
- Free – No charge but users must sign up for course access using an email.
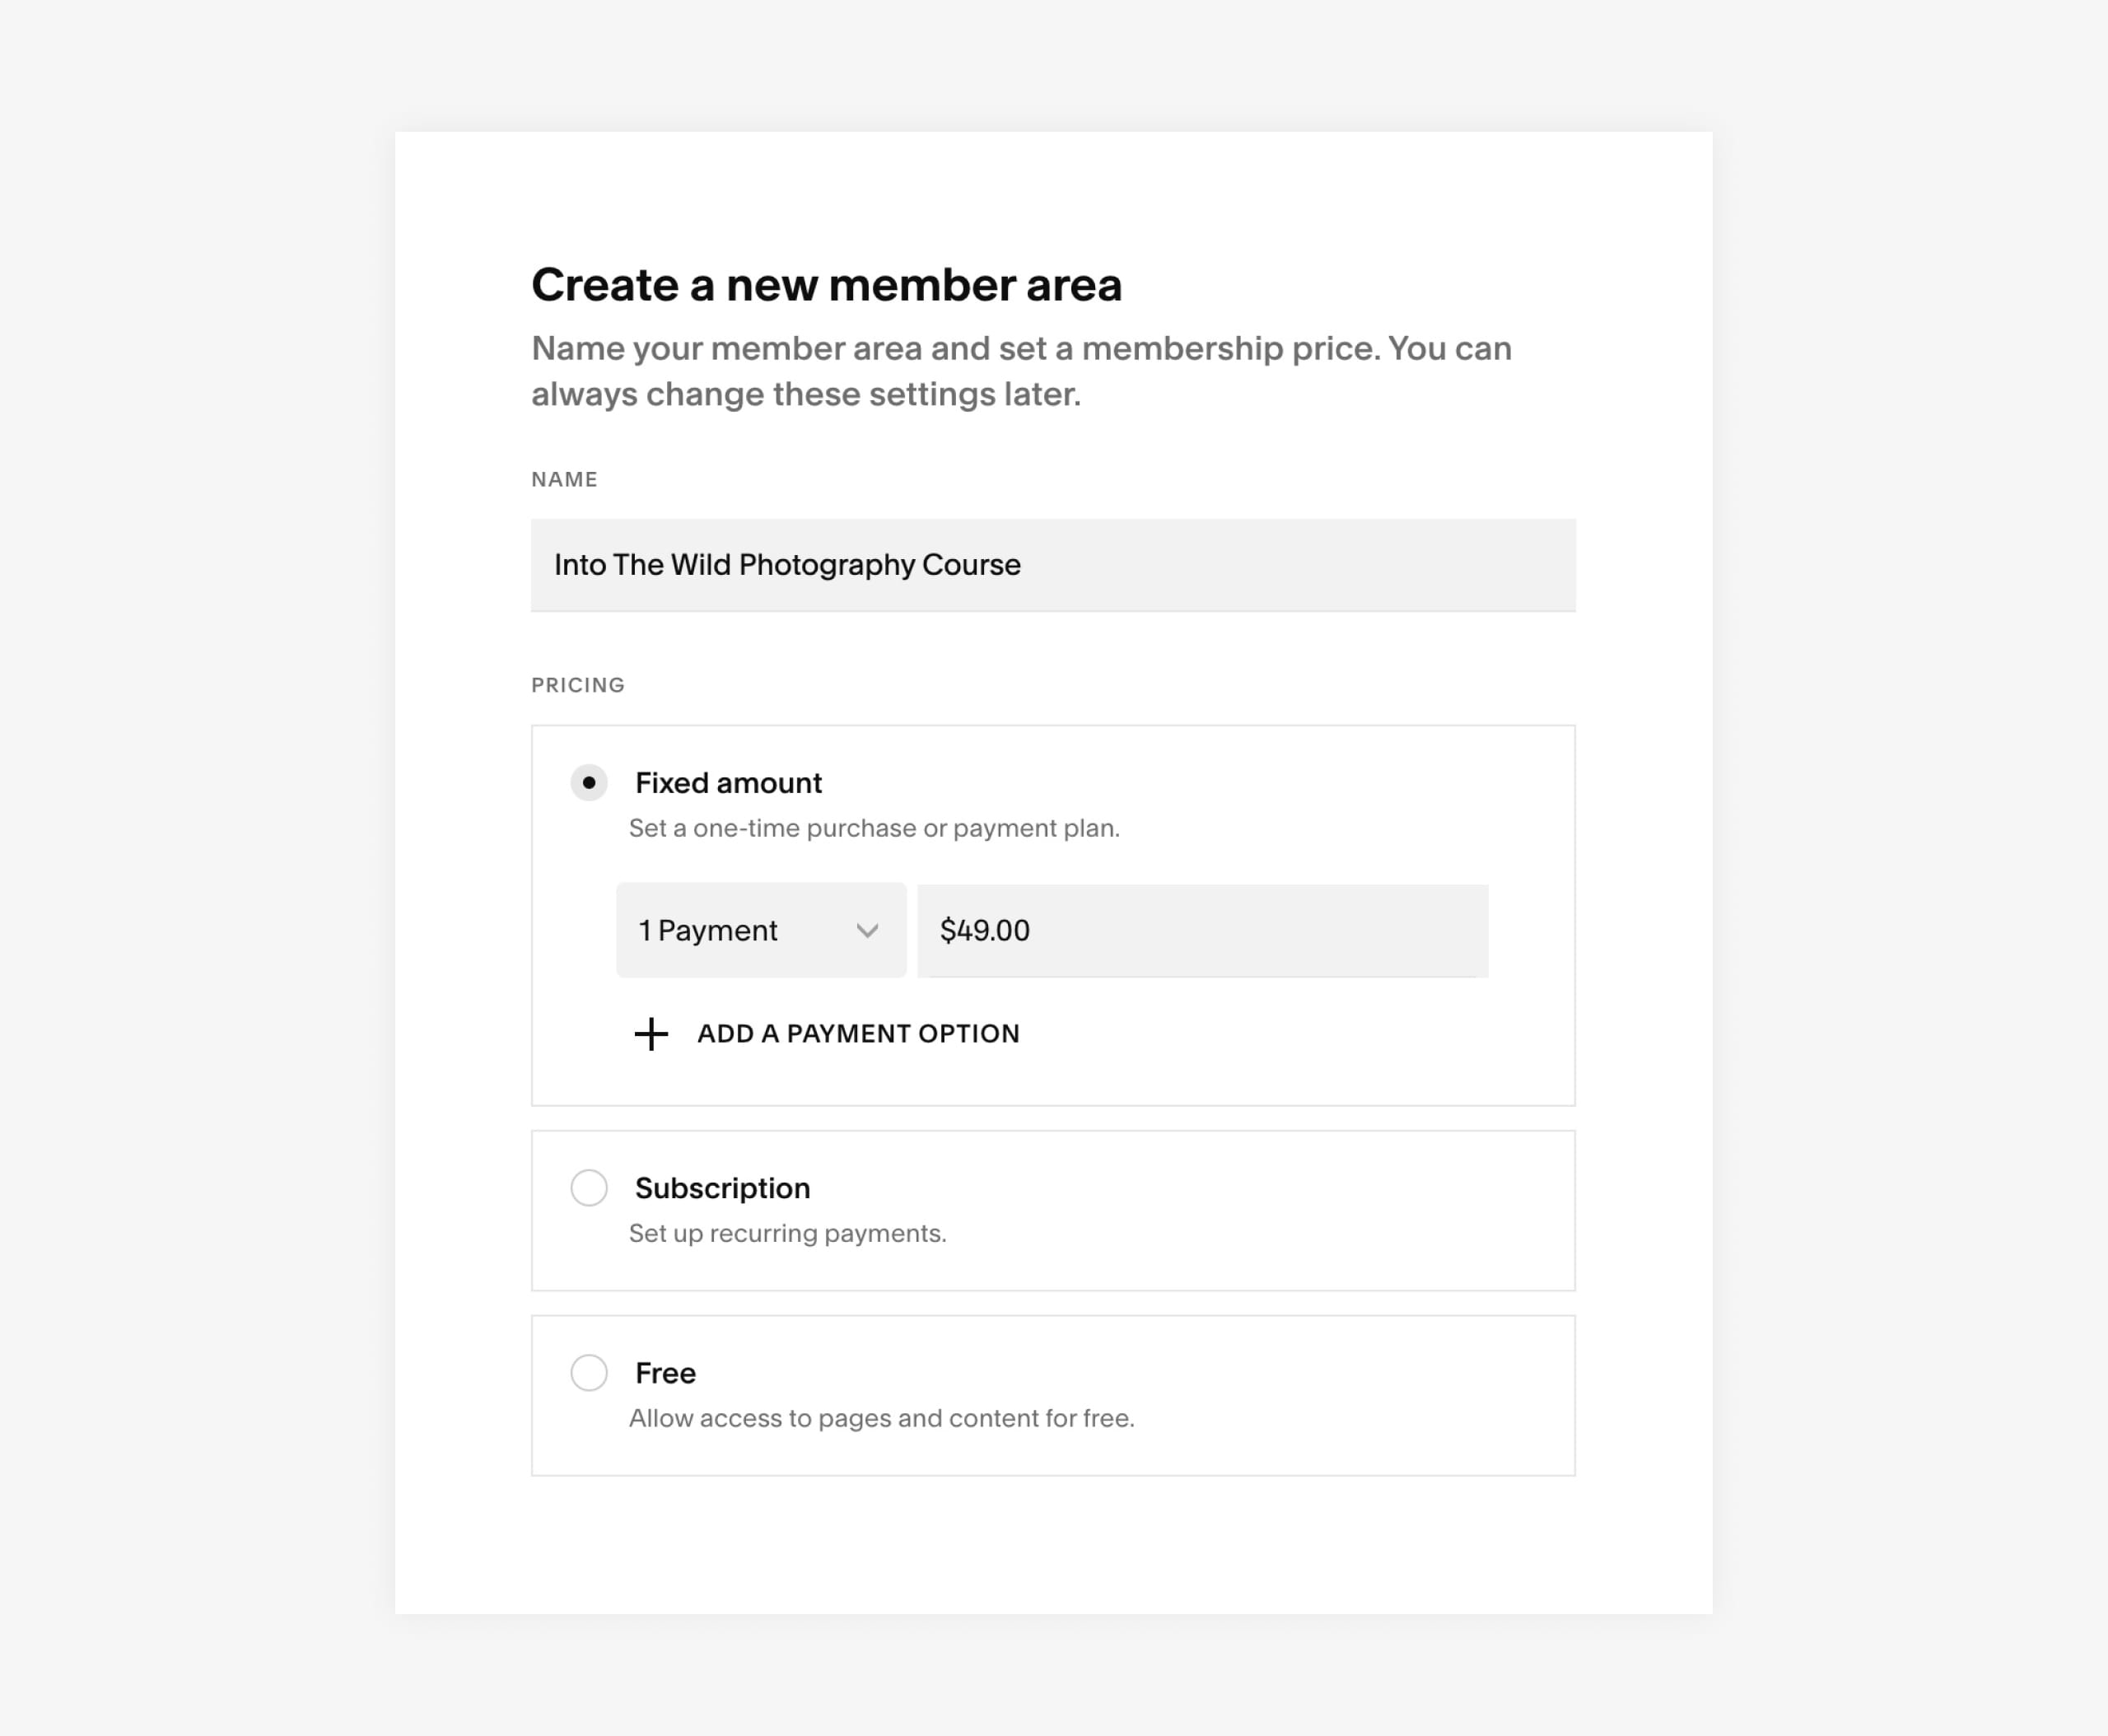
For our photography course I want a US$49 fixed, one-time payment:
4. Add course content and upload videos
On your main navigation, head on over to Pages where you should now notice a new Member Area. Pictured here is the one we just created for Into the Wild. The Member Area is empty, let’s add a Video Collection page like this:
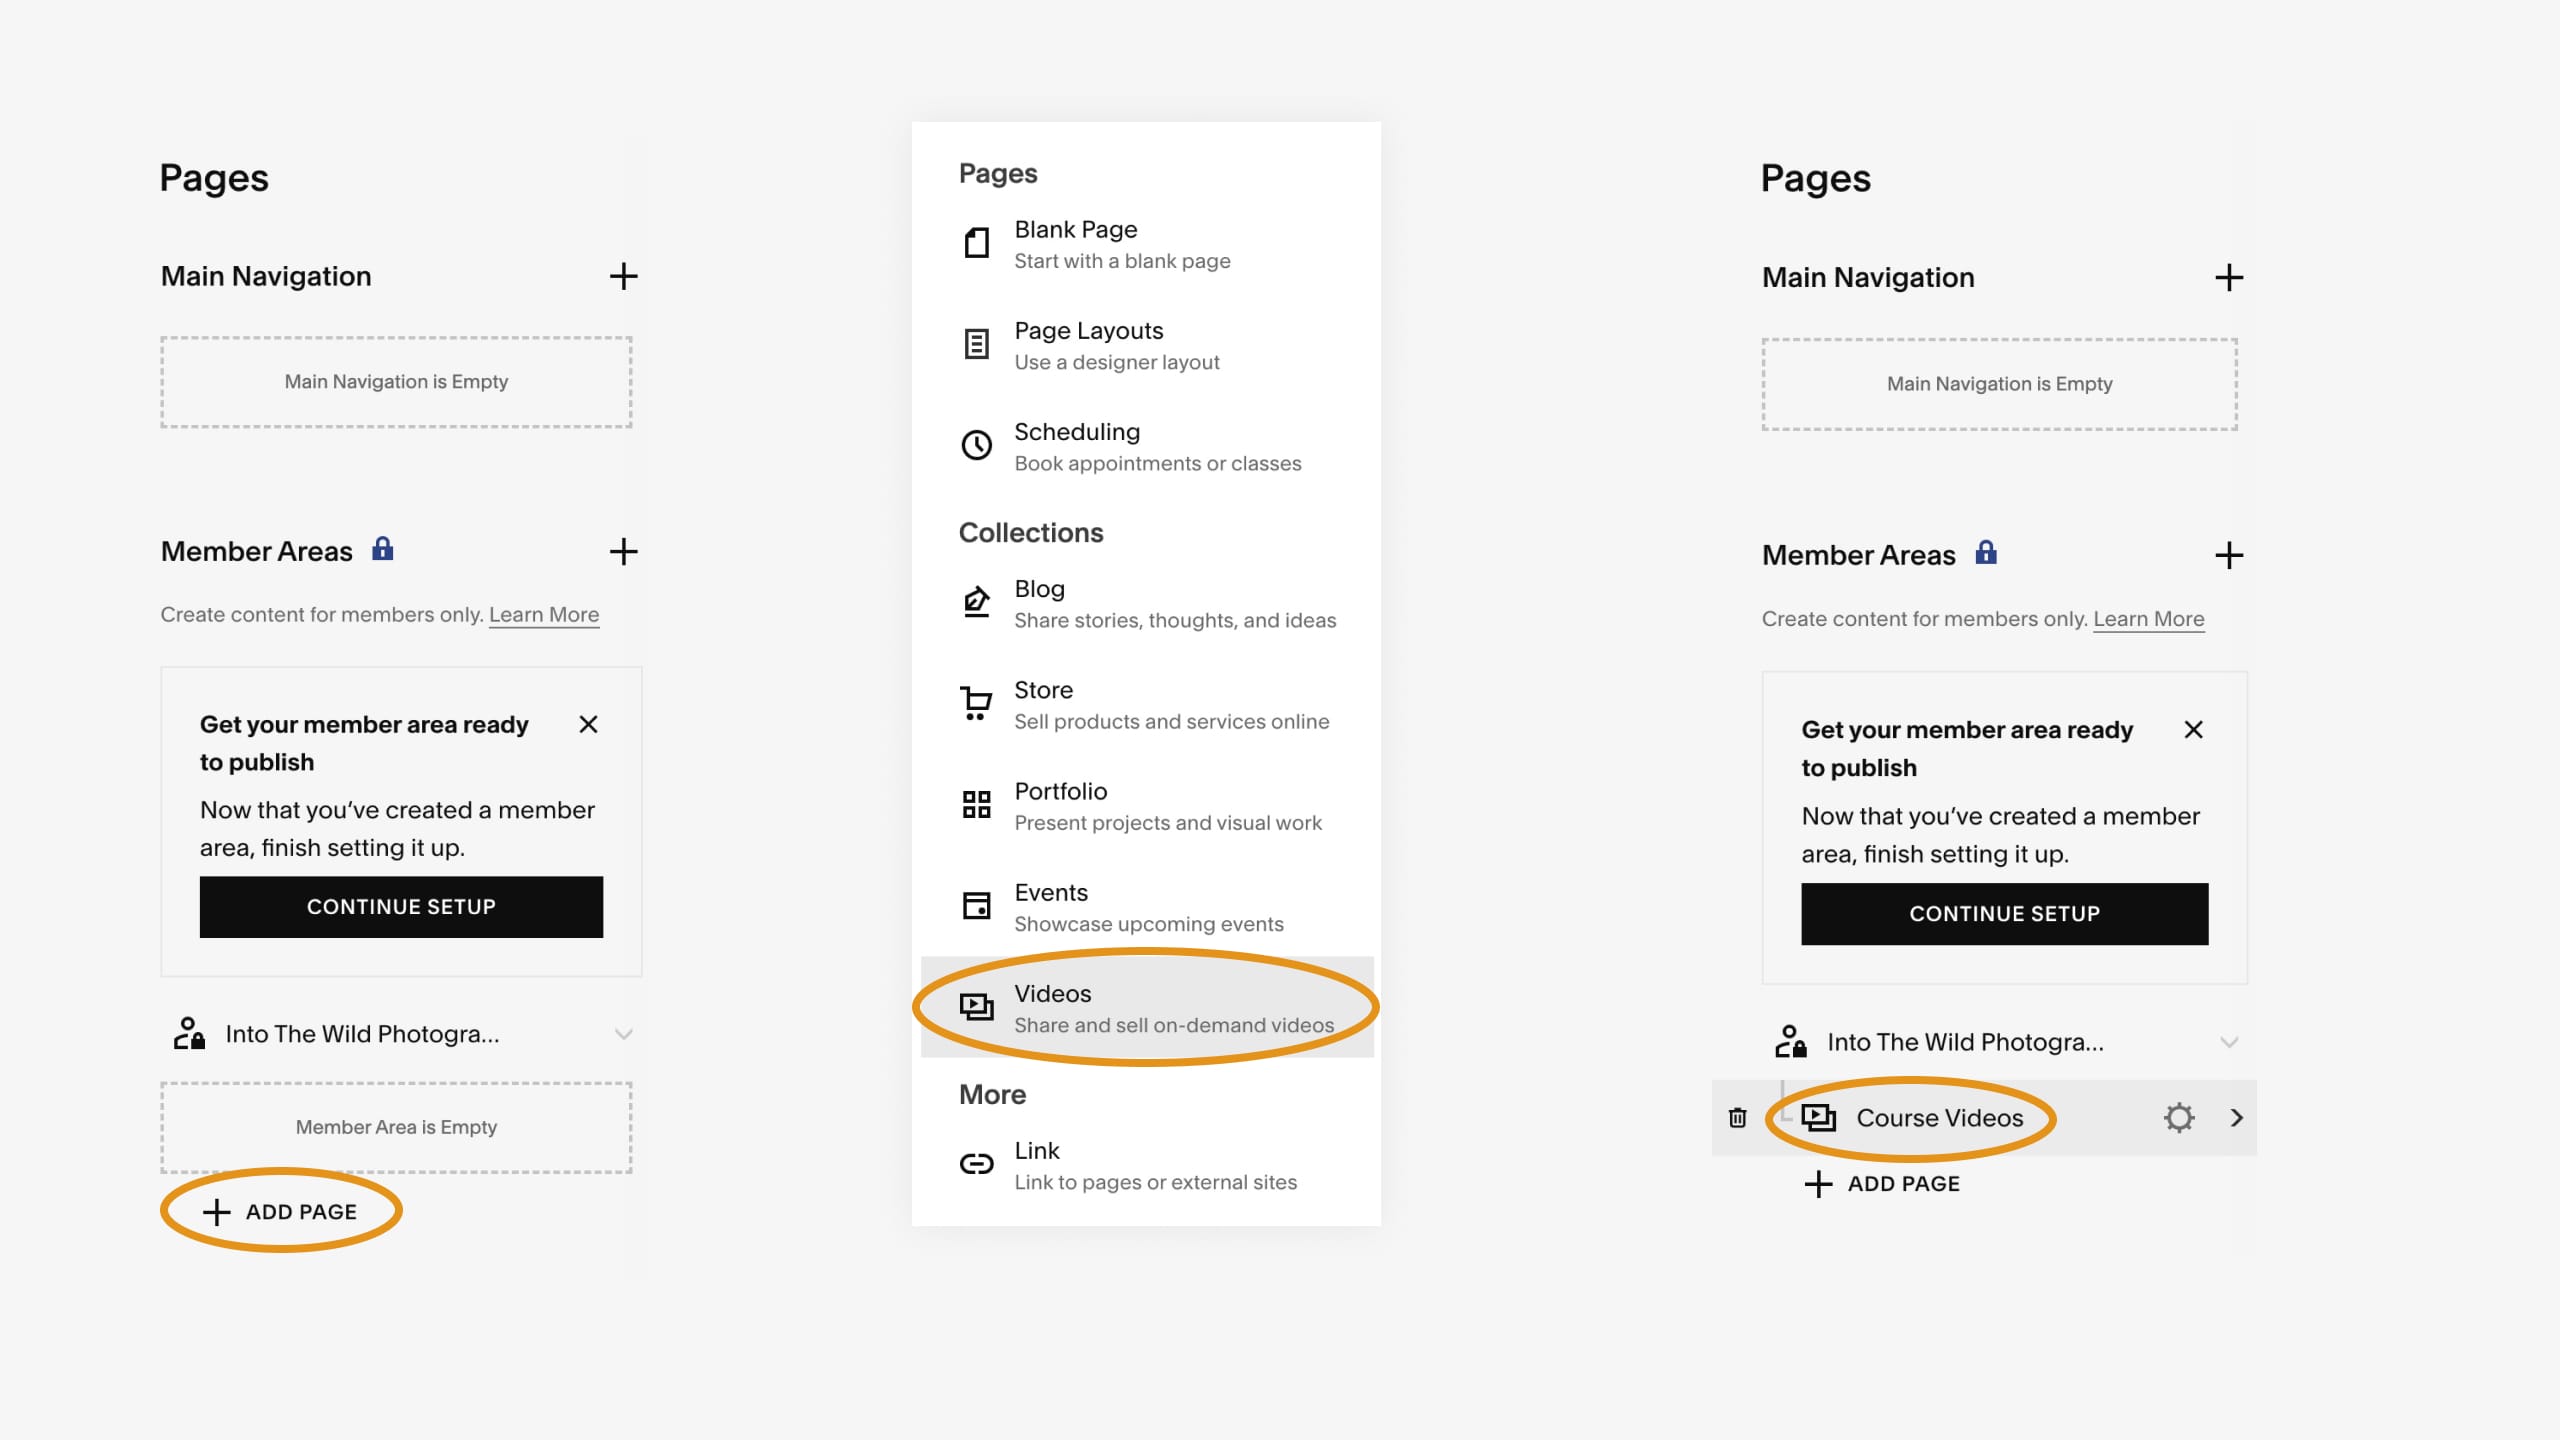
To help guide us, Squarespace has populated the new Video Collection with sample content for a Yoga studio. Let’s remove all the placeholder videos:
Our course is a simple 6 videos, so we won’t need to rename the placeholder categories either, just remove them:
Brilliant, a blank canvas, let’s upload our course’s first chapter into a draft.
Press the Add Video link in the left panel and proceed to add a title, upload your video, upload an optional video thumbnail, add teaser text (for the course overview page when logged in) and full description (for the course individual chapter page). Then hit save to save it to the collection:
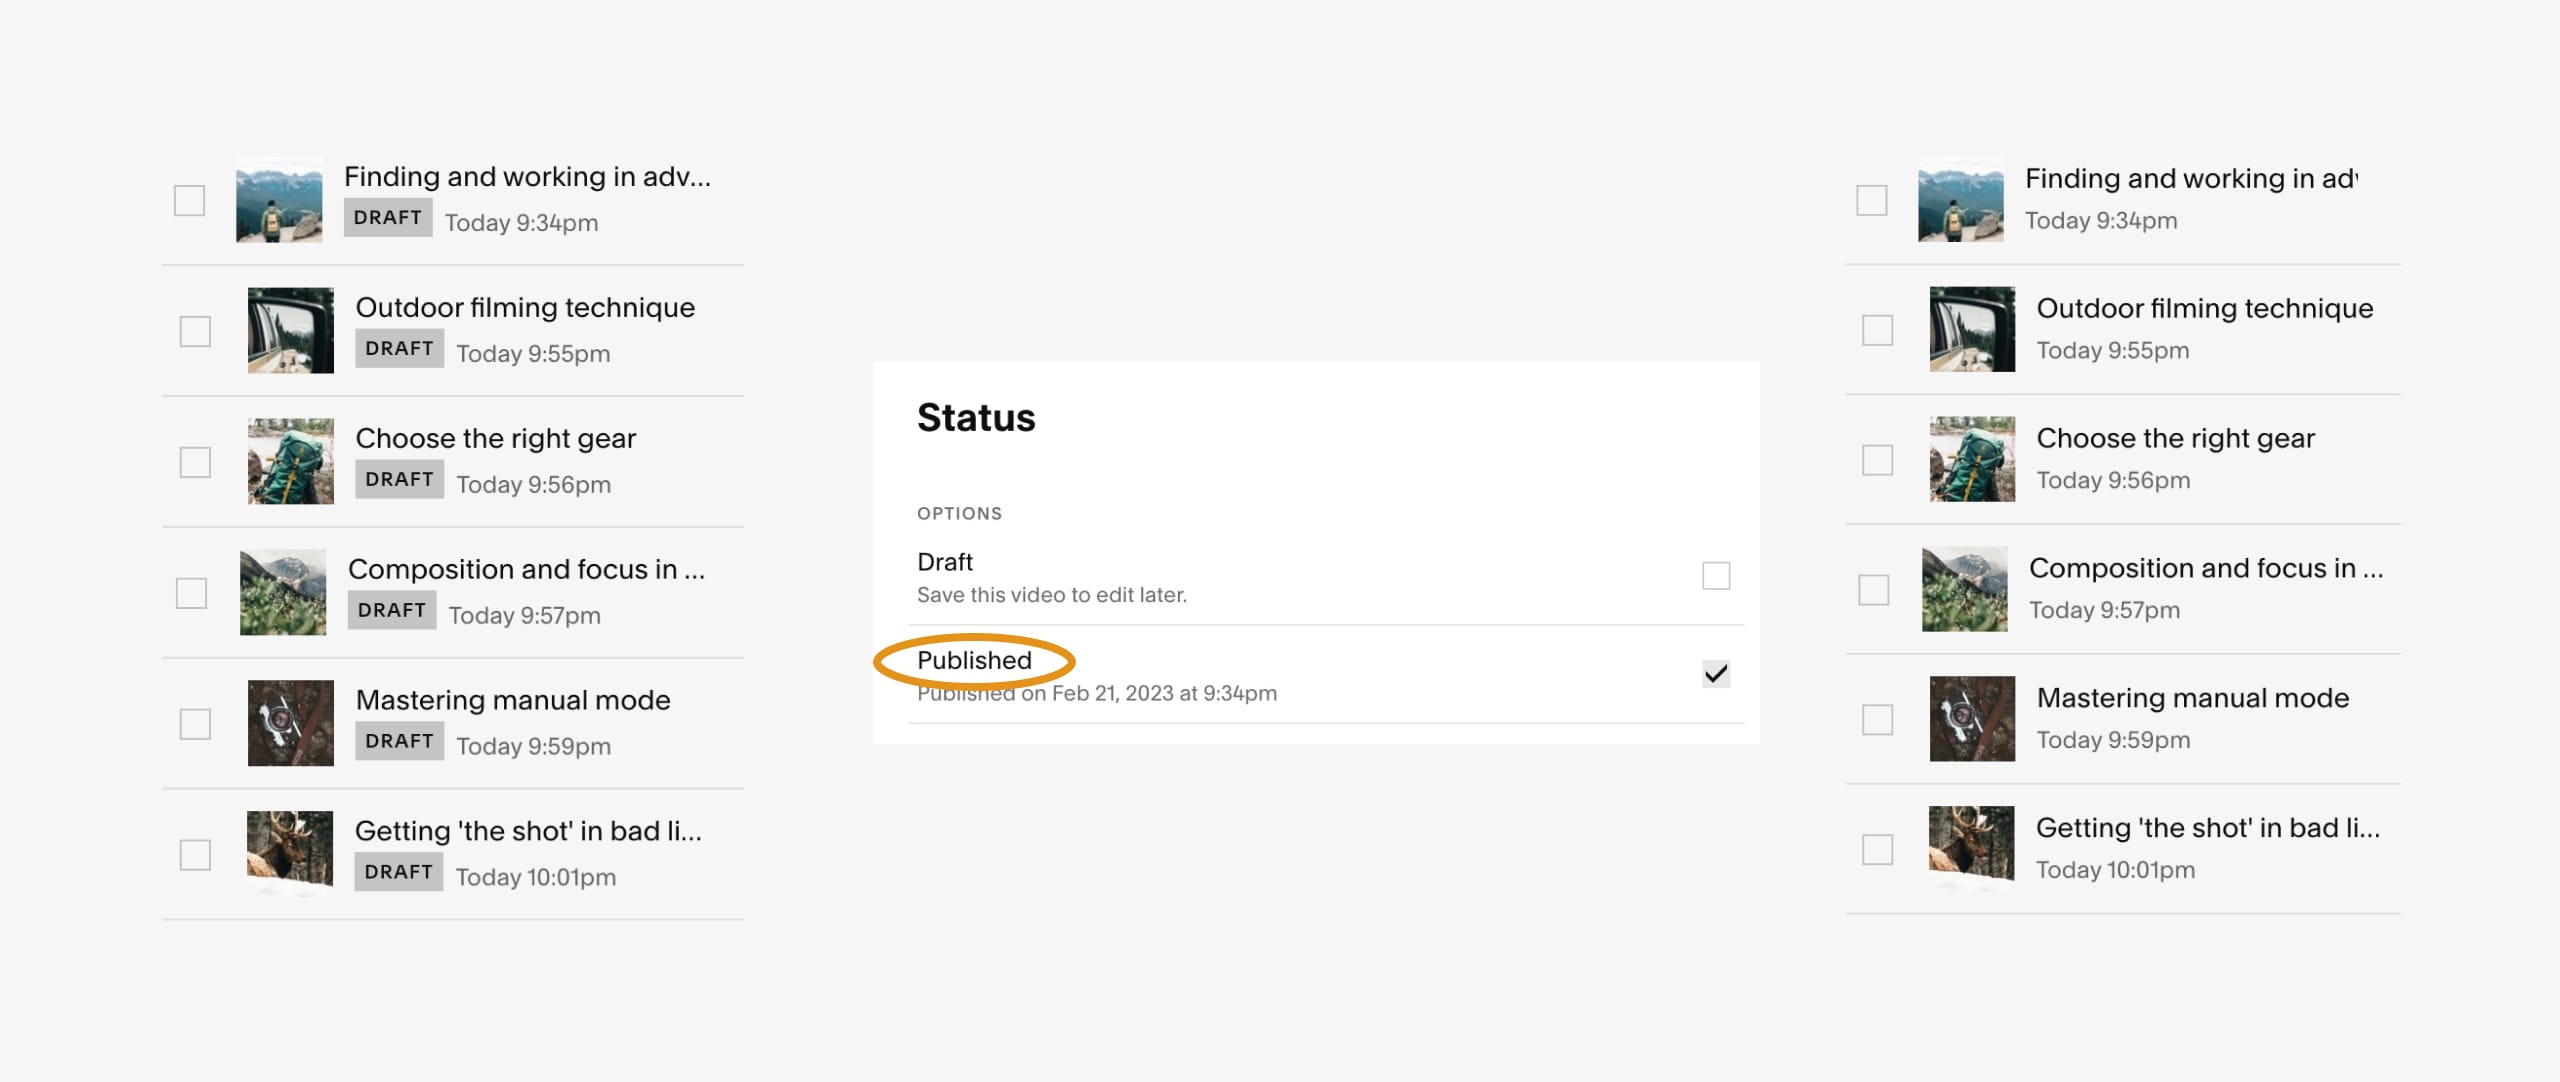
Continue to upload your remaining chapters into drafts. Draft mode is really neat to enable working on a new chapter while your existing course is live. Once you are happy with your chapter content and ordering (you can drag the order up and down), go into each and change the status from Draft to Published.
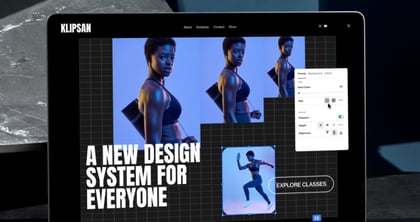
Next up is edit the page intro area currently filled with placeholder content and imagery. In this short 53 second video I demonstrate the following:
- Changing text by clicking within the elements.
- Dragging the text area wide to snap into the brilliant Fluid Engine grid interface.
- Rename the button and link to the first chapter (you would need to paste in your unique chapter 1 URL).
- Drag the button wider within the grid.
- Replace the background image.
- Change the color scheme of the header area.
- Reduce the grid rows.
A breeze right! Let’s step back and take a look:
Stunning. Ok, our course content is ready but there are still a few more quick Member Area steps to get through.
The Member Areas onboarding guide will suggest creating a Member Areas page but we don’t need that as we compiled our own course landing page.
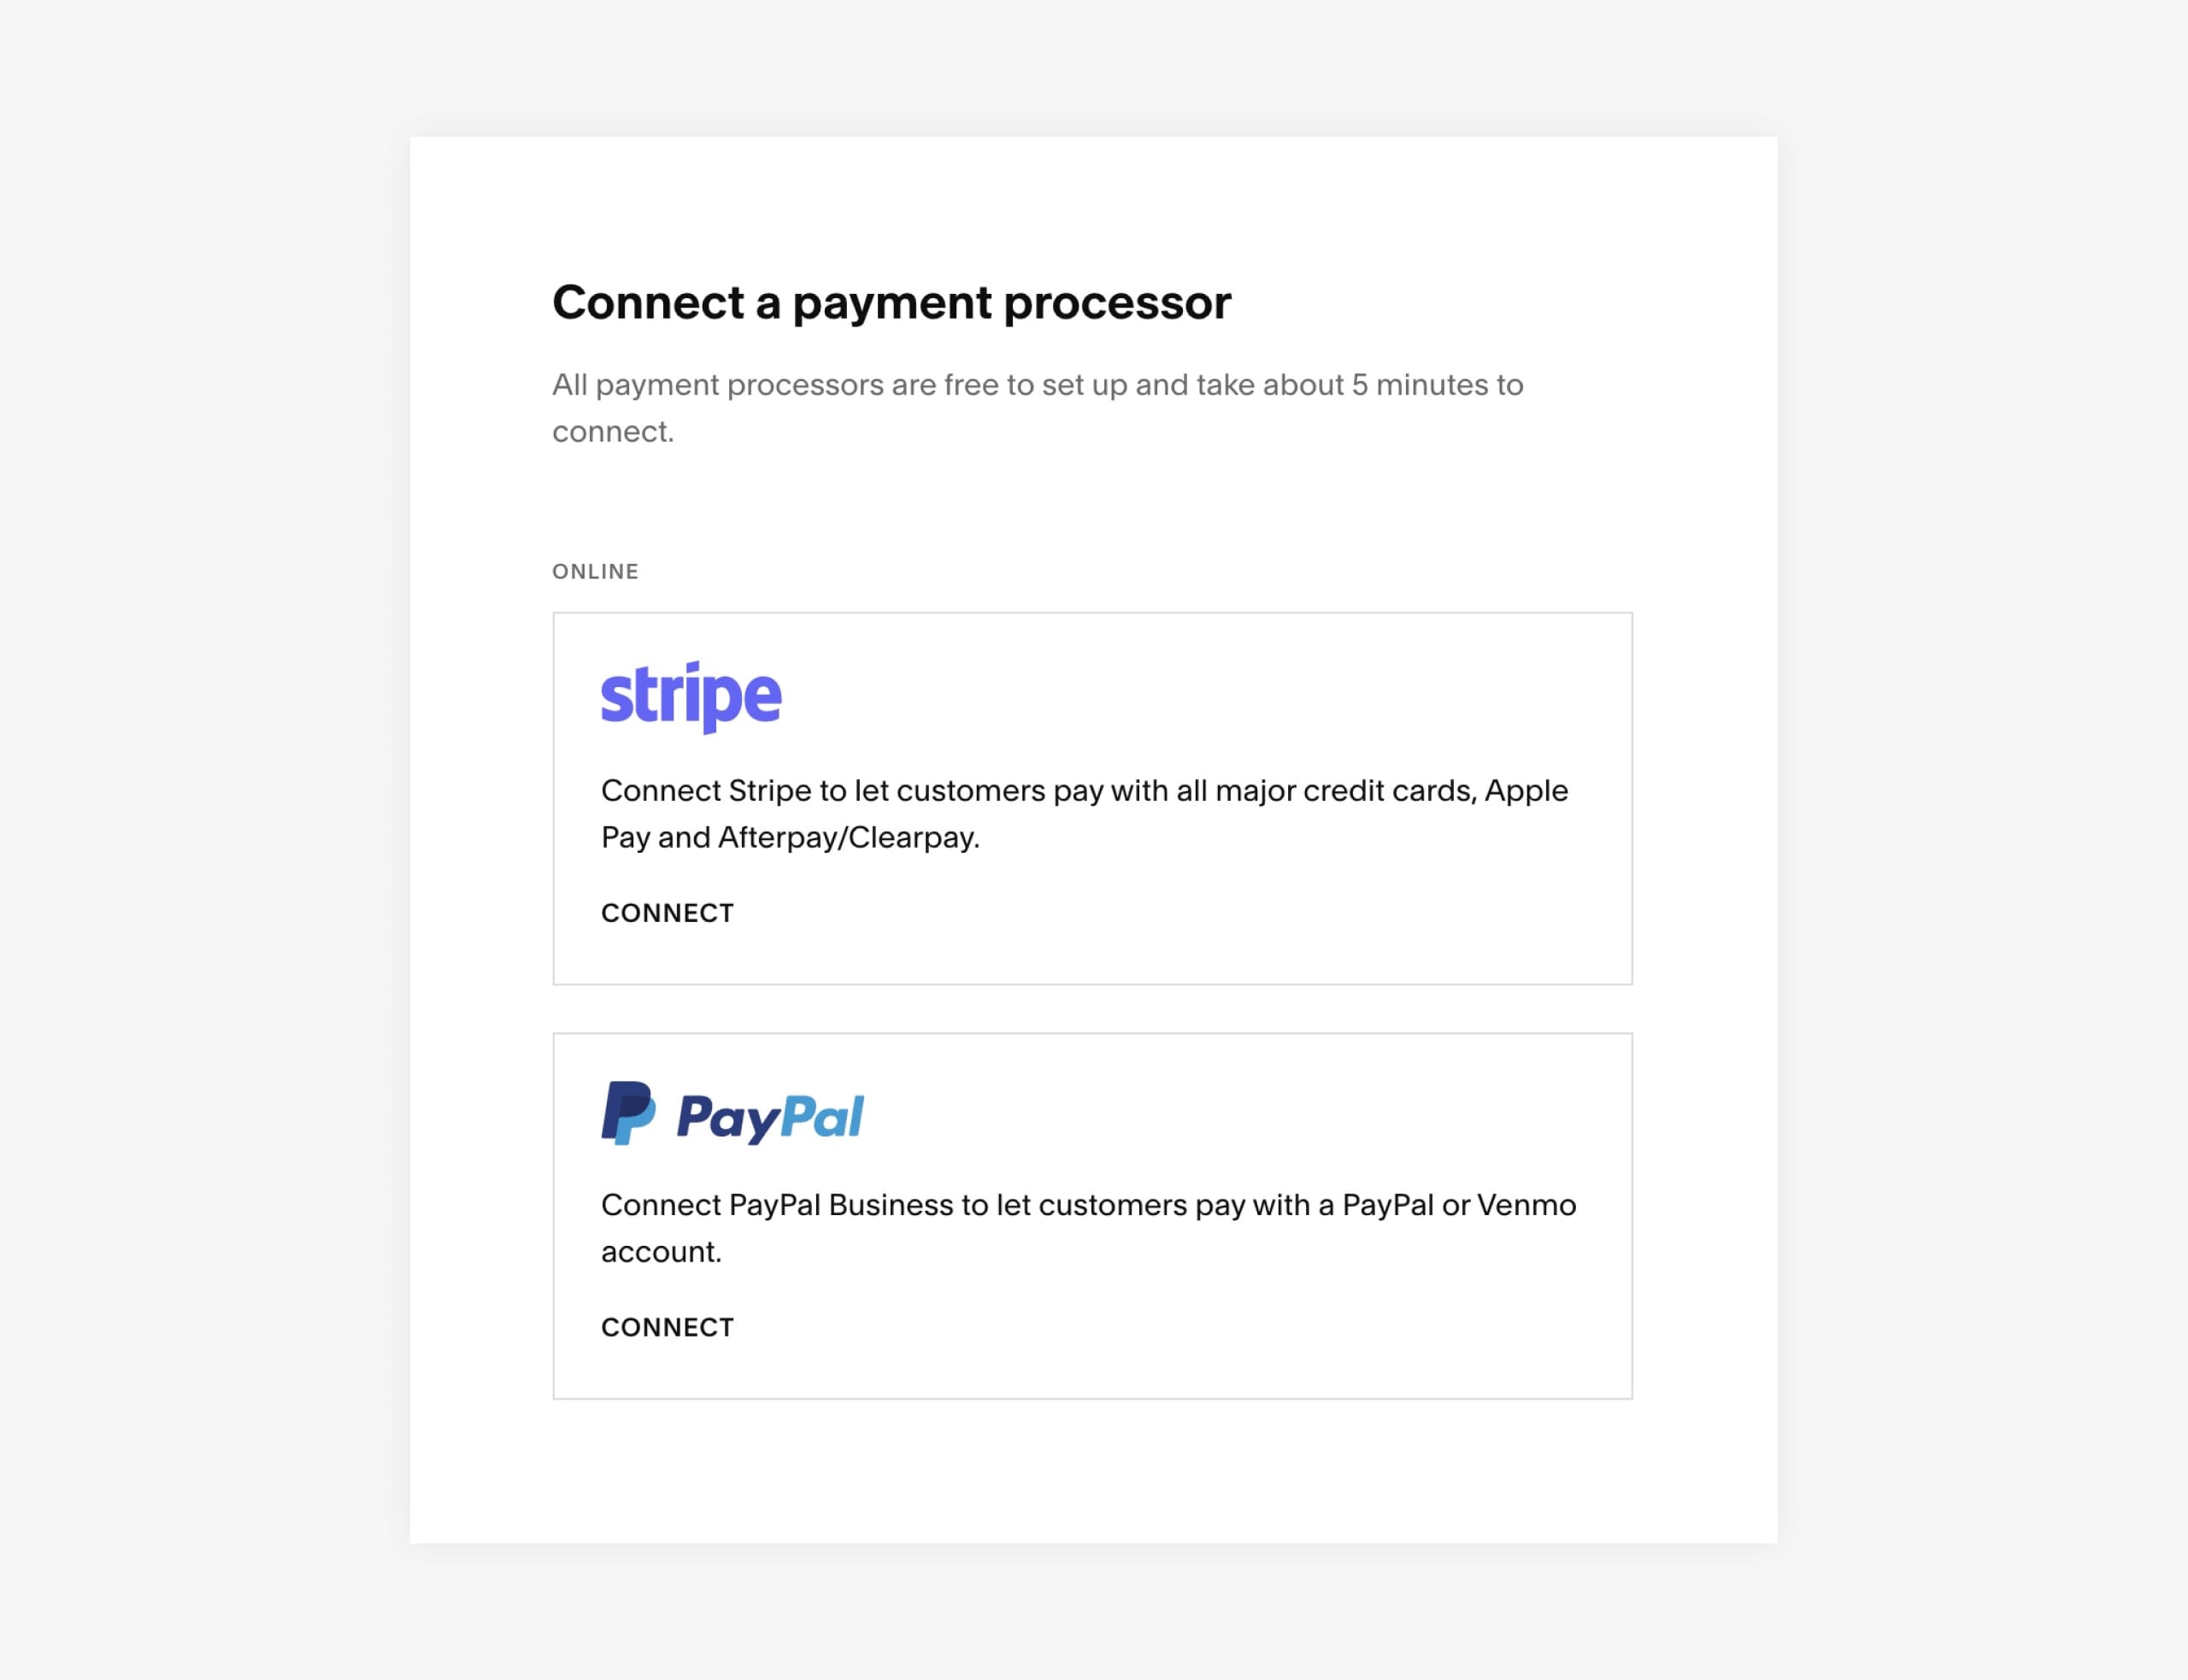
So the only item remaining (other than activating your Member Area when you are ready) is connecting your payment processor. Head to Settings > Commerce > Payments and connect a payment processor. After you connect on, customers will see its payment options at the course checkout. You can connect Stripe, PayPal, or both:
5. Refine course landing page
Our course private Member Area is ready, let’s add content to our course landing page. This is the public page we will share to promote our course. In this 63 second video I demonstrate the following:
- Replacing an image and defining a unique shape.
- Changing headline text by clicking within the elements.
- Formatting text into bold.
- Assigning a unique underline style effect to headline text.
- Dragging the headline area wide to snap into the Fluid Engine grid interface.
- Adding a Member Sign up button below the content (this prompts the sign up for the course).
Let’s take a look at the course intro before and after:

Now the course chapter overview before and after:
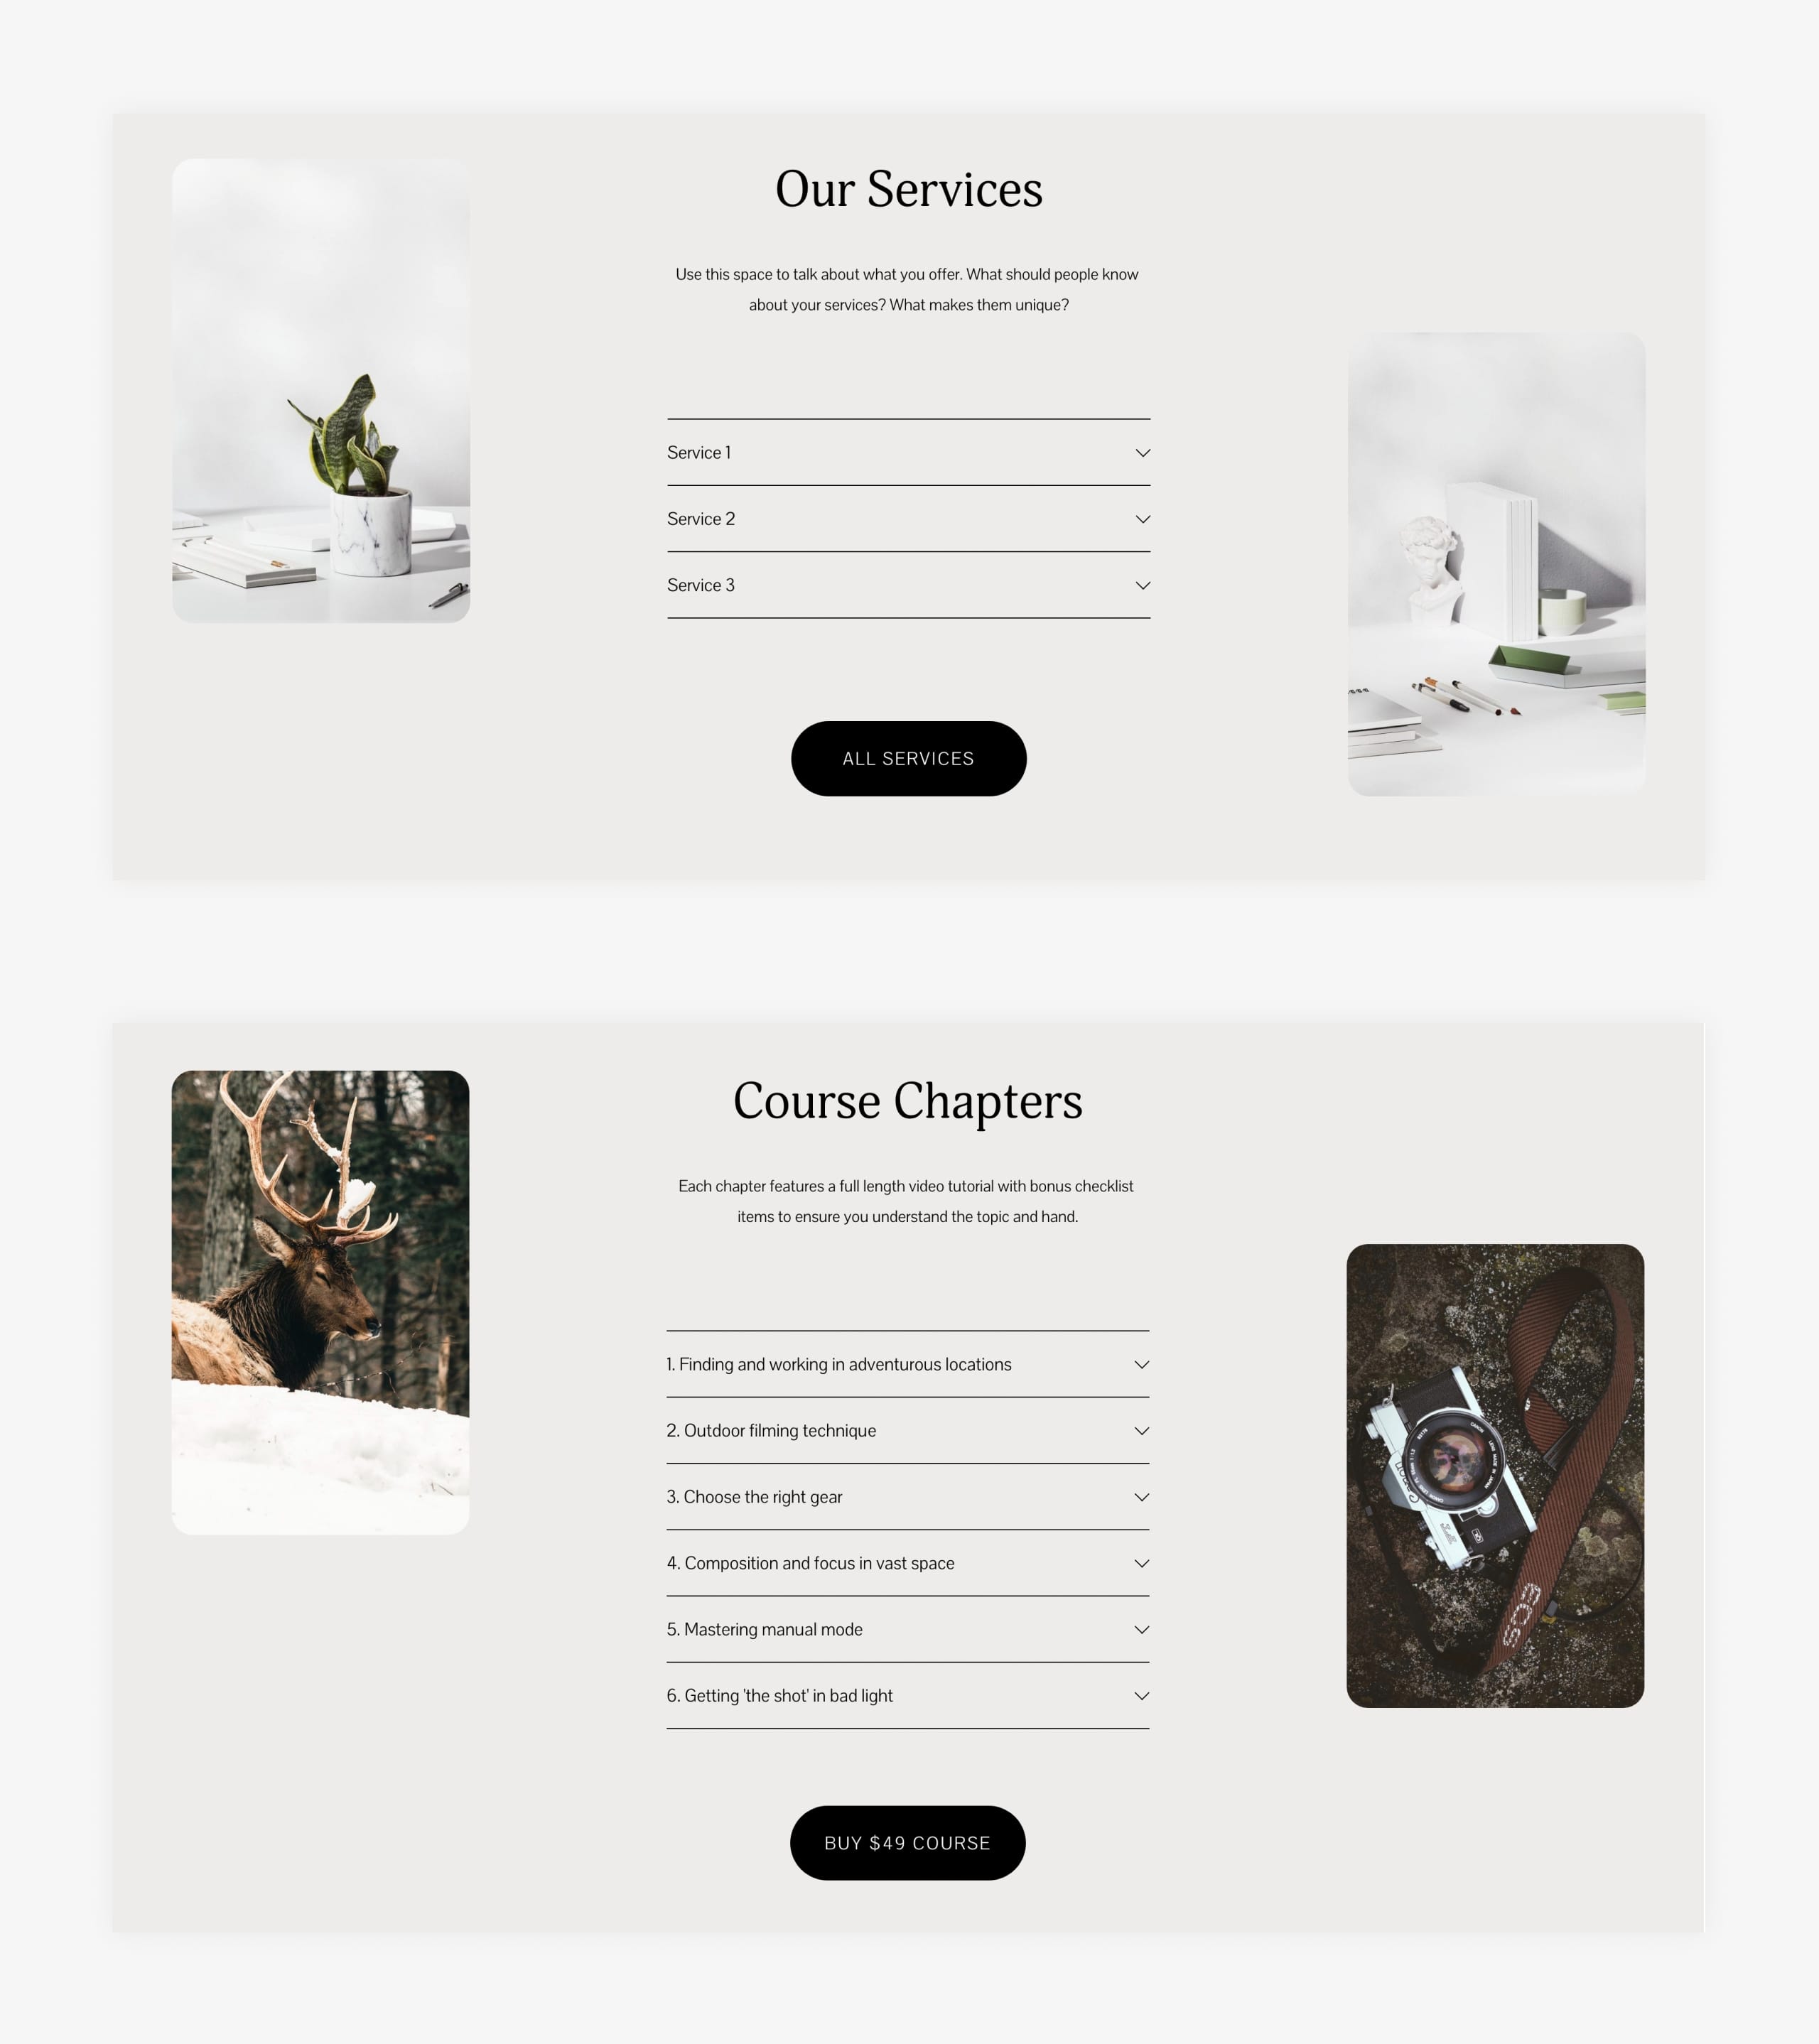
Then finally the instructor bio before and after.
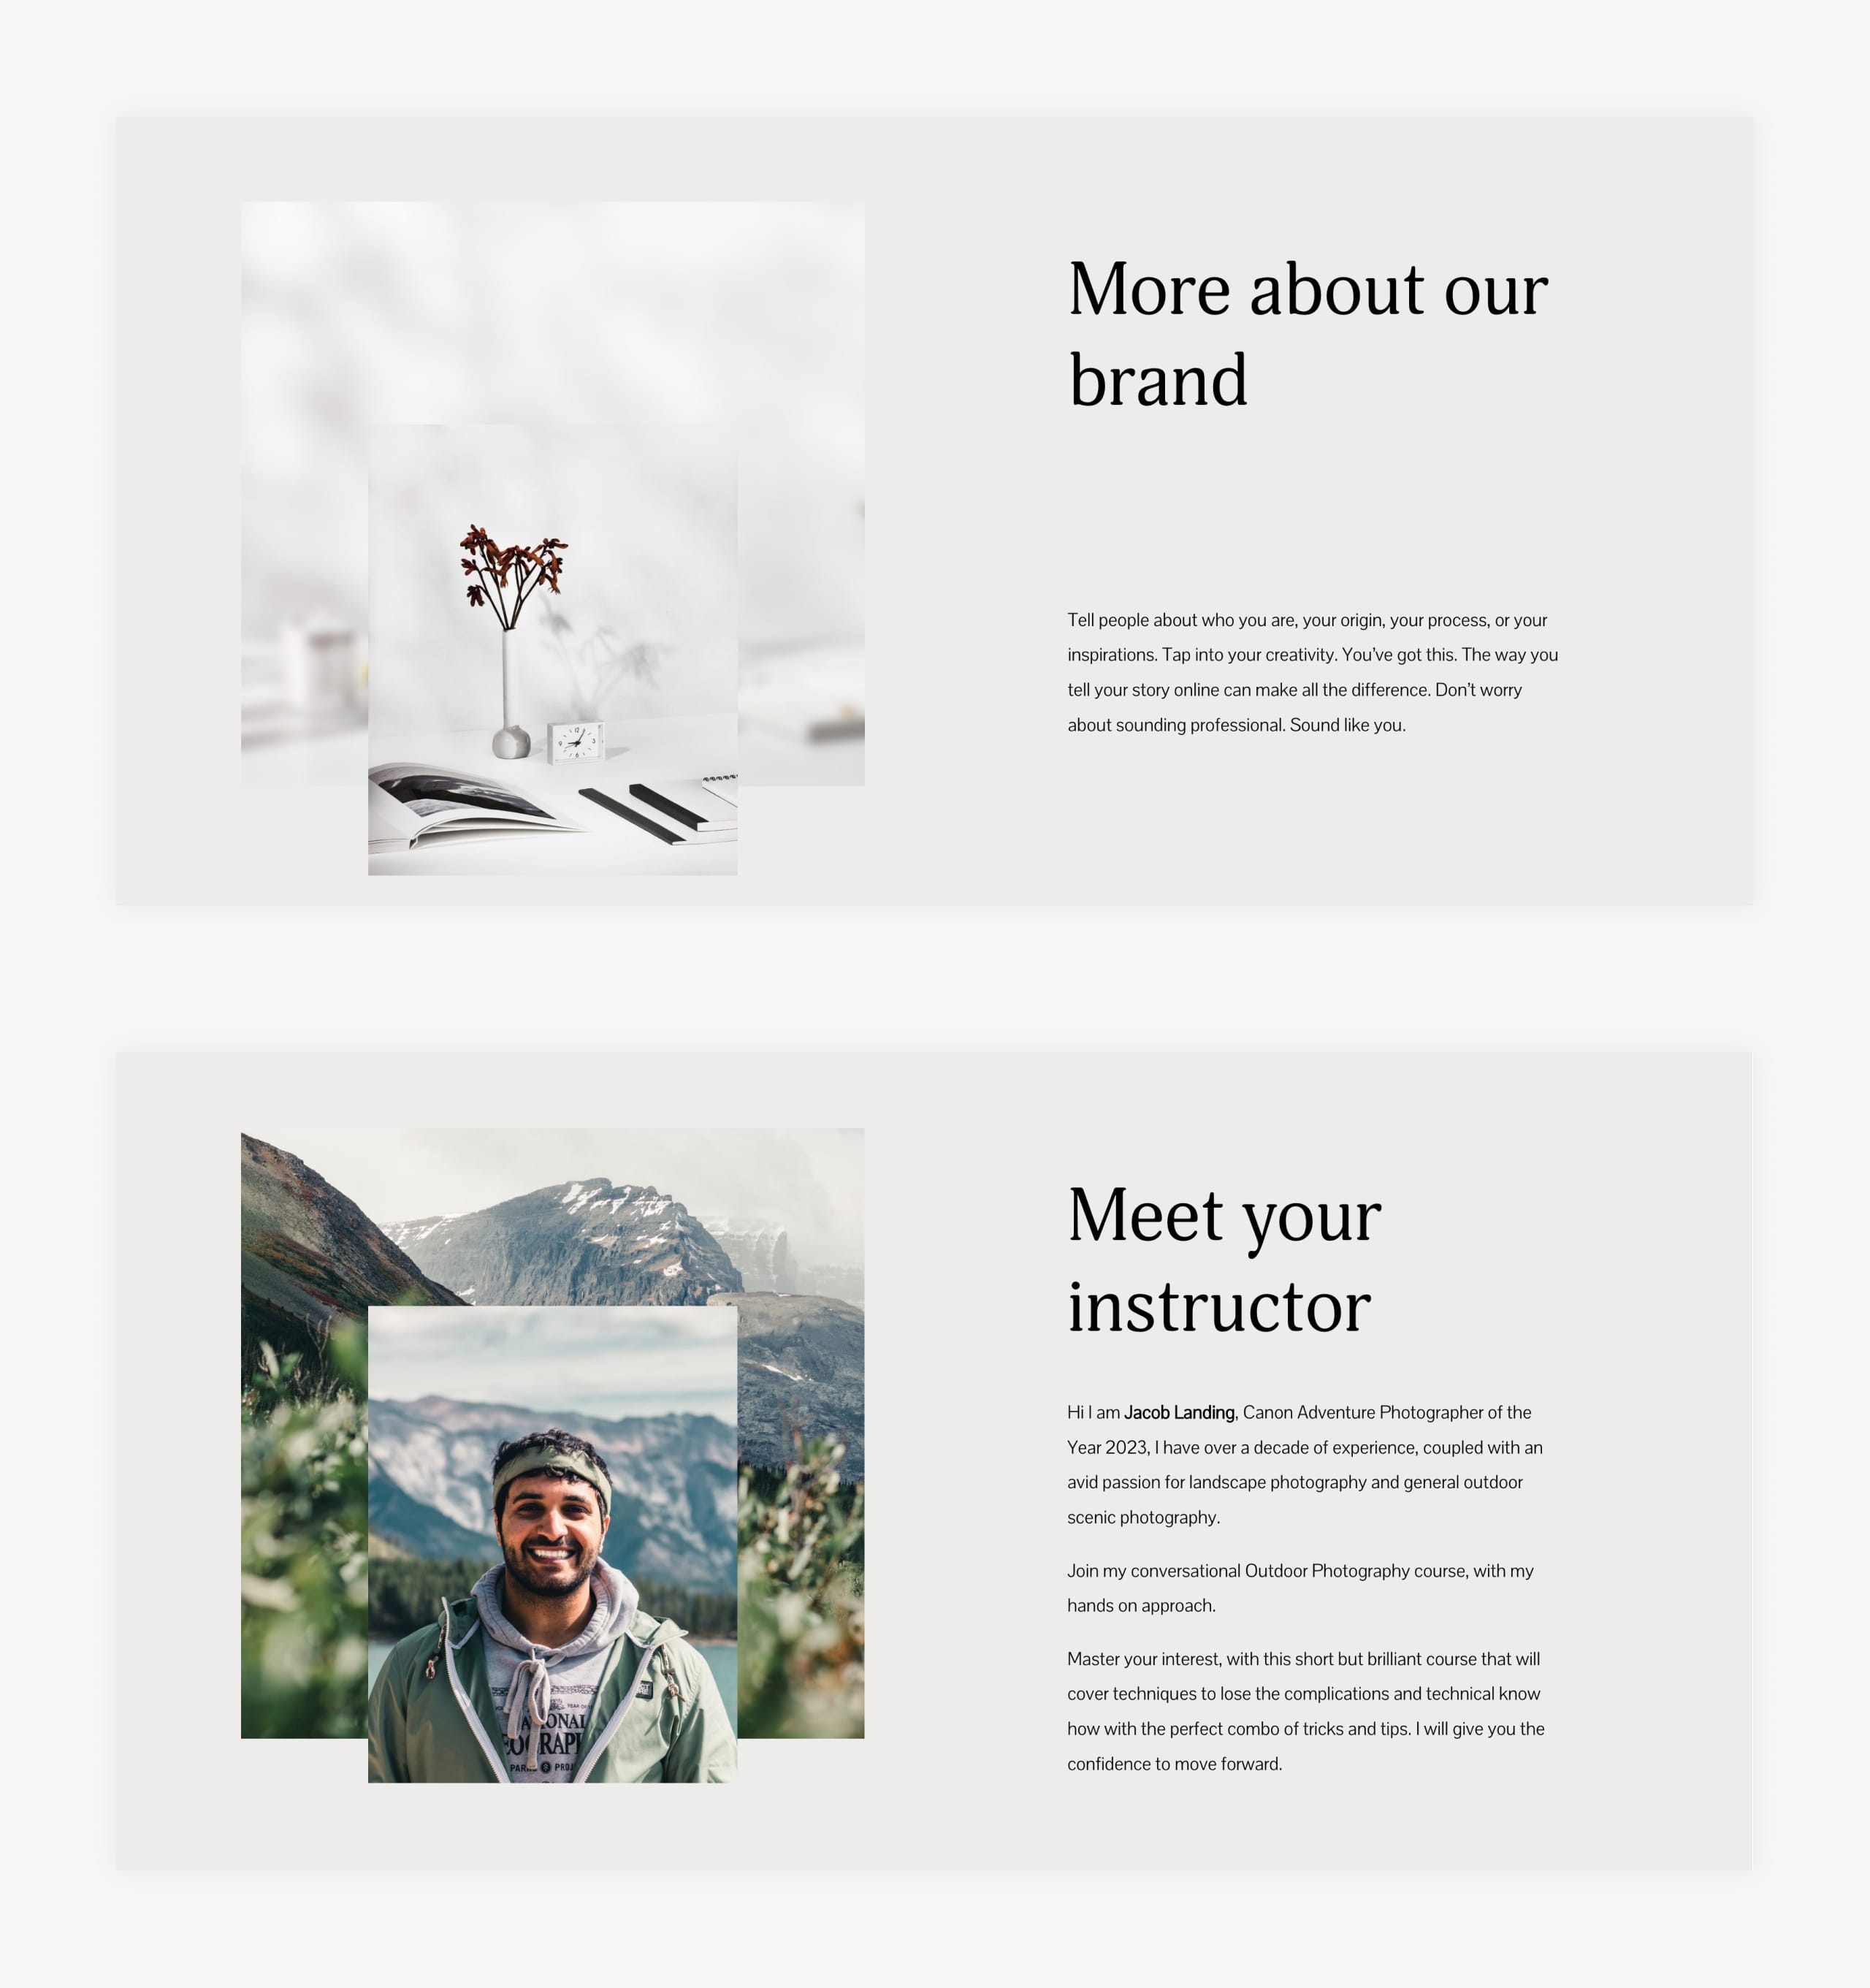
And one final look at it all together:
This is looking truly beautiful!
6. Connect your course domain name
Once you are happy with your course content and landing page design, you can transfer your custom domain to your Squarespace website.
Don’t have a domain name?
No problem! You can register a new domain through Squarespace and are eligible for a free .com domain for one year if you choose an annual billing plan for a new Squarespace website.
7. Announce your online course!
All that’s left now is to upgrade your Member Area to the Starter, Core or Pro Tier.
Congrats, it is time to share your new online course to your audience. That sure beats using several different services and you get this all for only $25 per month!
💡 Idea: Add a link to your course landing page to your Bio.Site. A Bio Site is a beautiful, mobile-friendly one page website that links to everything you offer in one place and is often linked from your social media accounts.
FAQ: What are the benefits of using Squarespace?
Squarespace is a leading online website builder. What sets them apart is their superior level of design and award-winning customer support team available 24/7. Other main benefits are:
- No Website Hosting Needed - their platform is fast and secure.
- Online Content Management - all edits are done within your browser, no software needed.
- Easily Drag and Drop Images - unlimited galleries with unlimited bandwidth.
- Free Domain Name - when registering for your first website, if you pay annually (renews at standard rate).
- Beautifully Responsive - all templates work for all devices, so you only have to design your website once. Test and preview how your website will appear on a range of screen sizes.
- Blog Sections - can easily be added for content marketing and to share your journey.
- Commerce Solutions - are an upgrade away if you want to start selling products.
- Email Marketing - gather email addresses, send marketing emails and analyze the reader email activity.
- Member Areas - create private website sections only accessible to signed-up or paying members.
- Scheduling - add an online scheduler to your site to diversify your revenue with professional services or classes.
That’s a wrap! Don’t forget your 10% Off coupon*: OPL10
That’s a creator tools wrap! Don’t forget your 10% Off coupon: OPL10
I hope you enjoyed this guide on how to create a successful online video course with Squarespace Member Areas! Props to Squarespace for creating an all in one platform for creators where we can set up our business with ease.
* The OPL10 coupon offer only applies to first payment of subscription on Squarespace, does not apply to future recurring payments or monthly plans, and may not be combined with any other offer codes or discounts.
Much love,
Rob
Twitter: @robhope
Email: [email protected]


![How to create a free link in Bio Site in minutes [video]](https://assets.onepagelove.com/cdn-cgi/image/width=420,height=222,fit=cover,gravity=top,format=jpg,quality=85/wp-content/uploads/2022/07/sqsp-thumb.jpg)