![]()
Appointment bookings can be a laborious and stressful task.
Solopreneurs and micro-businesses spend hours per month on back-and-forward comms, just to secure an agreeable meeting time.
Lucky for us, Acuity can help reclaim those valuable hours, and at an incredibly affordable cost per month.
Your clients will be able to self-schedule bookings based on your availability and they can even pay for the sessions using their credit cards. Wonderful!
In this tutorial I show you how easy it is to set up Acuity and start streamlining your bookings today. For a better learning experience, I’ve setup a fictitious social media consulting business called Megan Romero Consulting:
Before we get going, let’s settle the burning question…
FAQ: How much (exactly) does Acuity cost?
Acuity can work without a Squarespace website or in addition to an existing one. So for only $14/month (if paid annually) you can utilize an automated appointment scheduling tool that helps you book clients, boost revenue, and save time.
There are 3 Acuity pricing tiers:
| Scheduling package: | Emerging | Growing | Powerhouse |
|---|---|---|---|
| CalendarsFor each team member, employee, or location | 1 | 2-6 | 7-36 |
| Custom Payment Settings and Card Vaulting | ✓ | ✓ | ✓ |
| Automatic Reminder Emails | ✓ | ✓ | ✓ |
| SMS/Text Reminders | ✓ | ✓ | |
| Total CostPer month, if paid annually | $14 | $23 | $45 |
Bonus: If you might need a future website (including a blog for content marketing) it’s great to know it’s only an additional $16/month and a few clicks away.
Affordable right? Let’s dive into the setup tutorial!
One Page Love Exclusive Coupon
Yay! Squarespace has been kind enough to give One Page Love readers the exclusive coupon 10% off* for first payment of Squarespace Schedule subscription. (There is a free 14-day trial with no credit card needed, so you can try risk free.)
* The OPLSCHED10 coupon offer expires on 5/18/2023 11:59 PM EST and only applies to first payment of Squarespace Schedule subscription, does not apply to future recurring payments or monthly plans, and may not be combined with any other offer codes or discounts.
Setup Tutorial Overview:
- Sign up for Acuity
- Add your business details to the Scheduling walkthrough
- Calendar Customization
- Sync your calendar
- Embed your booking form or customize share URL
- Share your booking page
Step One: Sign up for Acuity
Head to the Acuity page and kick off your 14-day free trial like this:
If you already have a Squarespace website, simply click Scheduling from your site’s home menu to get started.
Step Two: Add your business details to the Scheduling walkthrough
Once signed up, the on-boarding experience is really easy but let me walk you through the process quickly. Enter in your business name and industry type, then click the Next button:
Now enter your availability in the week, click Next then select service type:
For this example we’re going with Appointments for 1:1 social media consulting. It’s good to know you have a Classes booking option for group sessions like yoga, seminars and community events.
Next up is setting up for your first appointment type. Enter an appointment name, price and duration:
And the last step in the walkthrough is connecting your payment processor to accept credit cards. Here I connect my Stripe account but you also have the option to connect Square or PayPal:
What a breezy walkthrough. Now for some customization.
Step Three: Calendar Customization
After onboarding you are taken to the Scheduling home page, which suggests you will still need to complete 2 more steps:

There is no imperative order to tackle these steps so let’s dive into the booking page appearance first.
In the left navigation, under the Client Scheduling Page section, click Customize Appearance. Now go through the various view settings, add your logo and description. Note there are two calendar template views to choose from:
- Monthly – best for clients booking more than a week in advance
- Daily – best for when clients always try to find the earliest convenient time
For Megan’s social media consulting business we’ll leave the Daily view. Here is a quick run through on everything mentioned above:
Step Four: Sync your calendar
Select the fourth on-boarding step to sync your calendar and go through the straightforward settings. Acuity seamlessly syncs with Google Calendar, iCloud and Outlook. You’ll notice I set the reminder settings to 15 minutes before each appointment, meaning our chosen calendar software will notified us then. Quite a neat feature and ensures we’re punctual:
Step Five: Embed your booking form or customize share URL
Head over to the remaining step of the Scheduling onboard process: adding the booking to your website.
You can insert the Scheduling booking form directly into any Squarespace website using the Appointment Scheduling Block or embed the booking form into any website using a small amount of iFrame code.
For this tutorial we are going to create a short share URL for Megan to link to from her social media profiles.
Squarespace owns the .as.me domain extension for Scheduling pages. By default you are assigned a long URL for your Scheduling page. Here I’ve customized the temporary URL to mrconsulting.as.me – clean and easy to pronounce when spreading the word:)
Step Six: Share your new booking page
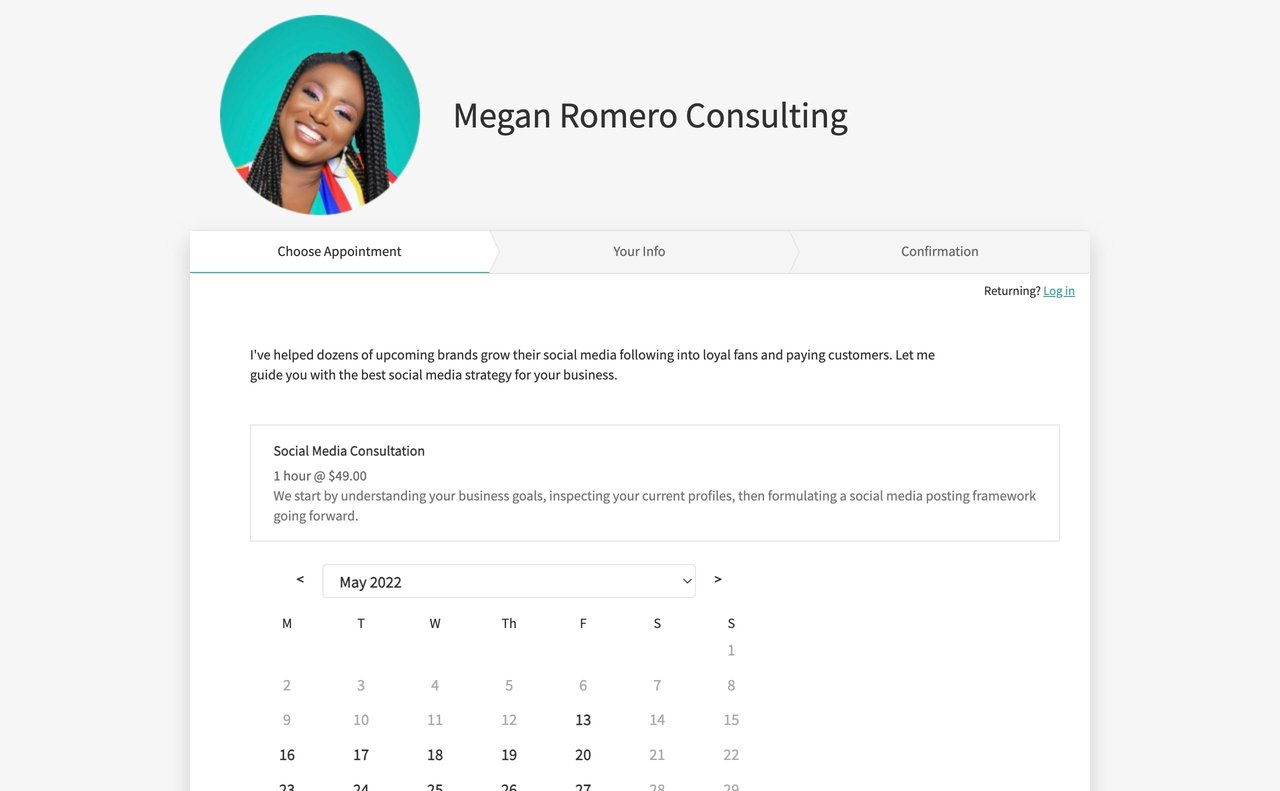
We now have a fully functioning booking calendar to share with your customers. Here is the booking view they see:
Well, that’s a wrap for the basic setup! Easy right? And only $14/month for this automated online assistant, working 24/7 to fill your schedule so all you need to do is show up at the right time.
FAQ: What are the benefits of using Squarespace?
Squarespace is a leading online website builder. What sets them apart is their superior level of design and award-winning customer support team available 24/7. Other main benefits are:
- No Website Hosting Needed - their platform is fast and secure.
- Online Content Management - all edits are done within your browser, no software needed.
- Easily Drag and Drop Images - unlimited galleries with unlimited bandwidth.
- Free Domain Name - when registering for your first website, if you pay annually (renews at standard rate).
- Beautifully Responsive - all templates work for all devices, so you only have to design your website once. Test and preview how your website will appear on a range of screen sizes.
- Blog Sections - can easily be added for content marketing and to share your journey.
- Commerce Solutions - are an upgrade away if you want to start selling products.
- Email Marketing - gather email addresses, send marketing emails and analyze the reader email activity.
- Member Areas - create private website sections only accessible to signed-up or paying members.
- Scheduling - add an online scheduler to your site to diversify your revenue with professional services or classes.
That’s a wrap! Don’t forget your 10% Off coupon*: OPL10
That’s a wrap!
I hope you enjoyed this beginner’s guide to Acuity! Props to Squarespace for creating a platform where we can let our clients self-schedule bookings, with ease. In case you missed it, I recently published a tutorial on How to sell your first online course using Squarespace.
* The OPL10 coupon offer only applies to first payment of subscription on Squarespace, does not apply to future recurring payments or monthly plans, and may not be combined with any other offer codes or discounts.
Much love,
Rob
Twitter: @robhope
Email: [email protected]


![How to create a free link in Bio Site in minutes [video]](https://assets.onepagelove.com/cdn-cgi/image/width=420,height=222,fit=cover,gravity=top,format=jpg,quality=85/wp-content/uploads/2022/07/sqsp-thumb.jpg)